Applies to: Exchange Server 2010 SP3, Exchange Server 2010 SP2
Topic Last Modified: 2011-03-19
You can set options in Queue Viewer to adjust the number of items that are displayed on the page and adjust the auto-refresh interval. The auto-refresh interval determines how frequently the results in Queue Viewer are updated.
Looking for other management tasks related to managing transport queues? Check out Managing Transport Queues.
Use the EMC to set Queue Viewer options
You need to be assigned permissions before you can perform this procedure. To see what permissions you need, see the "Queues" entry in the Transport Permissions topic.
 Note: Note: |
|---|
| You can't use the Shell to perform this task. |
- In the console tree, click Toolbox.
- In the result pane, click Queue Viewer.
- In the action pane, click Open Tool.
- Navigate to View > Options to open the
Queue Viewer Options dialog box. Configure the following
settings:
- In the Refresh interval (seconds) field, enter the
frequency at which Queue Viewer should update the display.
 Note:
Note:The default auto-refresh interval is 30 seconds and can't be set for a shorter time. If you disable auto-refresh functionality by clearing the Auto-refresh screen check box on the Queue Viewer Options page, you must manually update the results that are displayed in Queue Viewer by clicking Refresh. - In the Number of items to display on each page field,
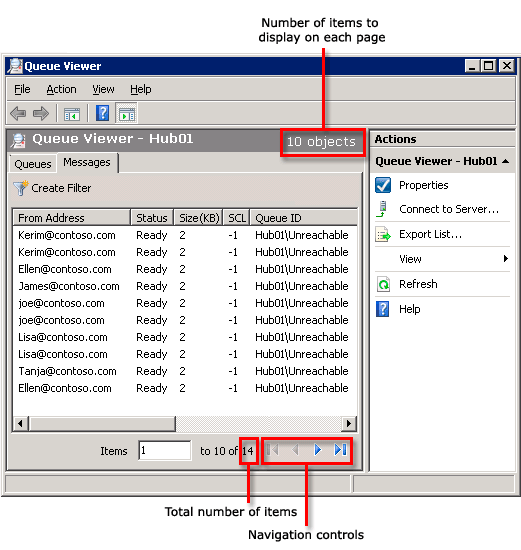
enter the maximum number of items to display in Queue Viewer. This
number must be from 1 through 10,000. If you have more items than
the limit, you will see the items in groups of the maximum number
of items. For example, the following figure shows a queue with 14
messages with Queue Viewer configured to display 10 items on each
page. The number of objects on the page is displayed on the upper
right. At the bottom of the page, you can see the total number of
items in the queue. You can use the navigation controls to see the
additional items in the queue.
- In the Refresh interval (seconds) field, enter the
frequency at which Queue Viewer should update the display.
- Click OK.


