

Applies to: Exchange Server 2010 SP3, Exchange Server 2010 SP2
Topic Last Modified: 2012-07-23
Microsoft Exchange Server 2010 includes a large set of predefined permissions, based on the Role Based Access Control (RBAC) permissions model, which you can use right away to easily grant permissions to your administrators and users. You can use the permissions features in Exchange 2010 so that you can get your new organization up and running quickly.
RBAC grants permissions to manage the Mailbox, Hub Transport, Client Access, and Unified Messaging server roles. For information about permissions on the Edge Transport server role, see Edge Transport Permissions later in this topic.
 Note: Note: |
|---|
| Several RBAC features and concepts aren't discussed in this topic because they're advanced features. If the functionality discussed in this topic doesn't meet your needs, and you want to further customize your permissions model, see Understanding Role Based Access Control. |
Looking for management tasks related to permissions? See Managing Permissions.
Role-Based Permissions
In Exchange 2010, the permissions that you grant to
administrators and users are based on management roles. A role
defines the set of tasks that an administrator or user can perform.
For example, a management role called Mail Recipients
defines the tasks that someone can perform on a set of mailboxes,
contacts, and distribution groups. When a role is assigned to an
administrator or user, that person is granted the permissions
provided by the role.
There are two types of roles, administrative roles and end-user roles:
- Administrative roles These roles
contain permissions that can be assigned to administrators or
specialist users using role groups that manage a part of the
Exchange organization, such as recipients, servers, or
databases.
- End-user roles These roles, assigned
using role assignment policies, enable users to manage aspects of
their own mailbox and distribution groups that they own. End-user
roles begin with the prefix
My.
Roles give permissions to perform tasks to administrators and users by making cmdlets available to those who are assigned the roles. Because the Exchange Management Console (EMC), Exchange Control Panel (ECP), and Exchange Management Shell use cmdlets to manage Exchange, granting access to a cmdlet gives the administrator or user permission to perform the task in each of the Exchange management interfaces.
Exchange 2010 includes approximately 60 roles that can be used to grant permissions. For a list of roles included with Exchange 2010, see Built-in Management Roles.
Role Groups and Role Assignment Policies
Roles grant permissions to perform tasks in Exchange 2010, but you need an easy way to assign them to administrators and users. Exchange 2010 provides you with the following to help you do that:
- Role groups Role groups enable you to
grant permissions to administrators and specialist users.
- Role assignment policies Role
assignment policies enable you to grant permissions to end users to
change settings on their own mailbox or distribution groups that
they own.
For more information about role groups and role assignment policies, see the following sections.
Role Groups
Every administrator that manages Exchange 2010 must be
assigned at least one or more roles. Administrators might have more
than one role because they may perform job functions that span
multiple areas in Exchange. For example, one administrator might
manage both recipients and Exchange servers. In this case, that
administrator might be assigned both the Mail
Recipients and Exchange Servers roles.
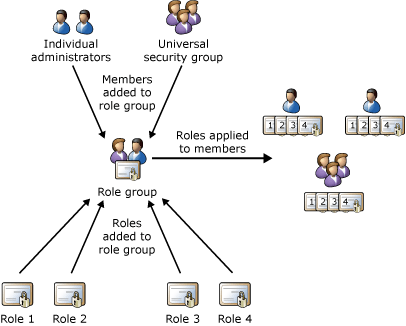
To make it easier to assign multiple roles to an administrator, Exchange 2010 includes role groups. Role groups are special universal security groups (USGs) used by Exchange 2010 that can contain Active Directory users, USGs, and other role groups. When a role is assigned to a role group, the permissions granted by the role are granted to all the members of the role group. This enables you to assign many roles to many role group members at once. Role groups typically encompass broader management areas, such as recipient management. They're used only with administrative roles, and not end-user roles.
| Note: |
|---|
| It's possible to assign a role directly to a user or USG without using a role group. However, that method of role assignment is an advanced procedure and isn't covered in this topic. We recommend that you use role groups to manage permissions. |
The following figure shows the relationship between users, role groups, and roles.
Exchange 2010 includes several built-in role groups, each one providing permissions to manage specific areas in Exchange 2010. Some role groups may overlap with others. The following table lists each role group with a description of its use. If you want to see the roles assigned to each role group, click the name of the role group in the table, and then open the "Management Roles Assigned to This Role Group" section.
Built-in role groups
| Role group | Description | ||
|---|---|---|---|
|
Administrators who are members of the Organization Management
role group have administrative access to the entire Exchange 2010
organization and can perform almost any task against any Exchange
2010 object, with some exceptions, such as the
|
|||
|
Administrators who are members of the View Only Organization Management role group can view the properties of any object in the Exchange organization. |
|||
|
Administrators who are members of the Recipient Management role group have administrative access to create or modify Exchange 2010 recipients within the Exchange 2010 organization. |
|||
|
Administrators who are members of the UM Management role group can manage features in the Exchange organization such as Unified Messaging (UM) server configuration, UM properties on mailboxes, UM prompts, and UM auto attendant configuration. |
|||
|
The Help Desk role group, by default, enables members to view and modify the Microsoft Office Outlook Web App options of any user in the organization. These options might include modifying the user's display name, address, and phone number. They don't include options that aren't available in Outlook Web App options, such as modifying the size of a mailbox or configuring the mailbox database on which a mailbox is located. |
|||
|
Administrators who are members of the Hygiene Management role group can configure the antivirus and anti-spam features of Exchange 2010. Third-party programs that integrate with Exchange 2010 can add service accounts to this role group to grant those programs access to the cmdlets required to retrieve and configure the Exchange configuration. |
|||
|
Users who are members of the Records Management role group can configure compliance features, such as retention policy tags, message classifications, and transport rules. |
|||
|
Administrators or users who are members of the Discovery Management role group can perform searches of mailboxes in the Exchange organization for data that meets specific criteria and can also configure legal holds on mailboxes. For more information, see Discovery and Understanding Litigation Hold. |
|||
|
Administrators who are members of the Public Folder Management role group can manage public folders and databases on servers running Exchange 2010. |
|||
|
Administrators who are members of the Server Management role group can configure server-specific configuration of transport, Unified Messaging, client access, and mailbox features such as database copies, certificates, transport queues and Send connectors, virtual directories, and client access protocols. |
|||
|
Administrators who are members of the Delegated Setup role group can deploy servers running Exchange 2010 that have been previously provisioned by a member of the Organization Management role group. For more information about delegated setup, see Provision Exchange 2010 Server and Delegate Setup. |
If you work in a small organization that has only a few administrators, you might need to add those administrators to the Organization Management role group only, and you may never need to use the other role groups. If you work in a larger organization, you might have administrators who perform specific tasks administering Exchange, such as recipient or server management. In those cases, you might add one administrator to the Recipient Management role group, and another administrator to the Server Management role group. Those administrators can then manage their specific areas of Exchange 2010 but won't have permissions to manage areas they're not responsible for.
If the built-in role groups in Exchange 2010 don't match the job function of your administrators, you can create role groups and add roles to them. For more information, see Work with Role Groups later in this topic.
Role Assignment Policies
Exchange 2010 provides role assignment policies so that you can control what settings your users can configure on their own mailboxes and on distribution groups they own. These settings include their display name, contact information, voice mail settings, and distribution group membership.
Your Exchange 2010 organization can have multiple role assignment policies that provide different levels of permissions for the different types of users in your organizations. Some users can be allowed to change their address or create distribution groups, while others can't, depending on the role assignment policy associated with their mailbox. Role assignment policies are added directly to mailboxes, and each mailbox can only be associated with one role assignment policy at a time.
Of the role assignment policies in your organization, one is marked as default. The default role assignment policy is associated with new mailboxes that aren't explicitly assigned a specific role assignment policy when they're created. The default role assignment policy should contain the permissions that should be applied to the majority of your mailboxes.
Permissions are added to role assignment policies using
end-user roles. End-user roles begin with My and grant
permissions for users to manage only their mailbox or distribution
groups they own. They can't be used to manage any other mailbox.
Only end-user roles can be assigned to role assignment
policies.
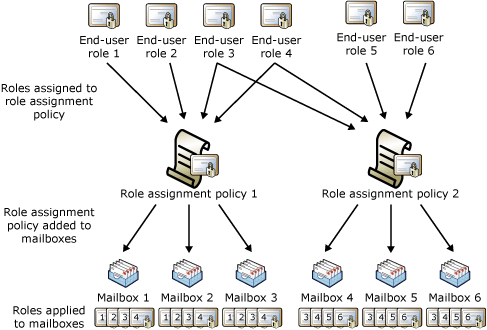
When an end-user role is assigned to a role assignment policy, all of the mailboxes associated with that role assignment policy receive the permissions granted by the role. This enables you to add or remove permissions to sets of users without having to configure individual mailboxes. The following figure shows:
- End-user roles are assigned to role assignment policies. Role
assignment policies can share the same end-user roles.
- Role assignment policies are associated with mailboxes. Each
mailbox can only be associated with one role assignment policy.
- After a mailbox is associated with a role assignment policy,
the end-user roles are applied to that mailbox. The permissions
granted by the roles are granted to the user of the mailbox.
The Default Role Assignment Policy role assignment policy is included with Exchange 2010. As the name implies, it's the default role assignment policy. If you want to change the permissions provided by this role assignment policy, or if you want to create role assignment policies, see Work with Role Assignment Policies later in this topic.
Work with Role Groups
To manage your permissions using role groups in Exchange 2010 Service Pack 1 (SP1), we recommend that you use the ECP. When you use the ECP to manage role groups, you can add and remove roles and members, create role groups, and copy role groups with a few clicks of your mouse. The ECP provides simple dialog boxes, such as the New Role Group dialog box, shown in the following figure, to perform these tasks.

As mentioned earlier in this topic, Exchange 2010 includes several role groups that separate permissions into specific administrative areas. If these existing role groups provide the permissions your administrators need to manage your Exchange 2010 organization, you need only add your administrators as members of the appropriate role groups. After you add administrators to a role group, they can administer the features that relate to that role group. To add or remove members to or from a role group, open the role group in the ECP, and then add or remove members from the membership list. For a list of built-in role groups, see Built-in Role Groups.
 Important: Important: |
|---|
| If an administrator is a member of more than one role group, Exchange 2010 grants the administrator all of the permissions provided by the role groups he or she is a member of. |
If none of the role groups included with Exchange 2010 have the permissions you need, you can use the ECP to create a role group and add the roles that have the permissions you need. For your new role group, you will:
- Choose a name for your role group.
- Select the roles you want to add to the role group.
- Add members to the role group.
- Save the role group.
After you create the role group, you manage it like any other role group.
If there's an existing role group that has some, but not all of the permissions you need, you can copy it and then make changes to create a role group. You can copy an existing role group and make changes to it, without affecting the original role group. As part of copying the role group, you can add a new name and description, add and remove roles to and from the new role group, and add new members. When you create or copy a role group, you use the same dialog box that's shown in the preceding figure.
Existing role groups can also be modified. You can add and remove roles from existing role groups, and add and remove members from it at the same time, using an ECP dialog box similar to the one in the preceding figure. By adding and removing roles to and from role groups, you turn on and off administrative features for members of that role group. For a list of roles you can add to a role group, see Built-in Management Roles.
| Note: |
|---|
| Although you can change which roles are assigned to built-in role groups, we recommend that you copy built-in role groups, modify the role group copy, and then add members to the role group copy. |
For detailed steps about how to create or copy role groups, or make changes to existing role group roles and membership, see the following topics:
Work with Role Assignment Policies
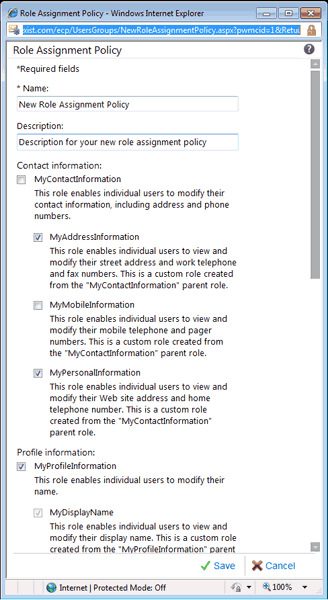
To manage the permissions that you grant end users to manage their own mailbox in Exchange 2010 SP1, we recommend that you use the ECP. When you use the ECP to manage end-user permissions, you can add roles, remove roles, and create role assignment policies with a few clicks of your mouse. The ECP provides simple dialog boxes, such as the Role Assignment Policy dialog box, shown in the following figure, to perform these tasks. To apply a role assignment policy to a mailbox, you can use either the EMC or the ECP.
Exchange 2010 includes a role assignment policy named Default Role Assignment Policy. This role assignment policy enables users whose mailboxes are associated with it to do the following:
- Join or leave distribution groups that allow members to manage
their own membership.
- View and modify basic mailbox settings on their own mailbox,
such as Inbox rules, spelling behavior, junk mail settings, and
Microsoft ActiveSync devices.
- Modify their contact information, such as address and phone
number.
- Create, modify, or view text message settings.
- View or modify voice mail settings.
If you want to add or remove permissions from the Default Role Assignment Policy or any other role assignment policy, you can use the ECP. The dialog box you use is similar to the one in the preceding figure. When you open the role assignment policy in the ECP, select the check box next to the roles you want to assign to it or clear the check box next to the roles you want to remove. The change you make to the role assignment policy is applied to every mailbox associated with it.
If you want to assign different end-user permissions to the various types of users in your organization, you can create role assignment policies. When you create a role assignment policy, you see a dialog box similar to the one in the preceding figure. You can specify a new name for the role assignment policy, and then select the roles you want to assign to the role assignment policy. After you create a role assignment policy, you can associate it with mailboxes using the EMC or the ECP.
If you want to change which role assignment policy is the default, you must use the Shell. When you change the default role assignment policy, any mailboxes that are created will be associated with the new default role assignment policy if one wasn't explicitly specified. The role assignment policy associated with existing mailboxes doesn't change when you select a new default role assignment policy.
| Note: |
|---|
| If you select a check box for a role that has child roles, the check boxes for the child roles are also selected. If you clear the check box for a role with child roles, the check boxes for the child roles are also cleared. |
For detailed steps about how to create role assignment policies or make changes to existing role assignment policies, see the following topics:
Edge Transport Permissions
The Edge Transport server role is deployed in an organization's perimeter network, which is also known as the boundary network or screened subnet. An Edge Transport server can be deployed as a stand-alone server or as a member of a perimeter Active Directory domain.
On Edge Transport servers, RBAC isn't used to control permissions. The local Administrators group is used to control who can configure Exchange features on the local server. If you have multiple Edge Transport servers, you need to add the user you want to manage those servers to the local Administrators group on each server.
For more information about permissions on Edge Transport servers, see Setting Administrator Permissions for the Edge Transport Server Role.