Applies to: Exchange Server 2010 SP3, Exchange Server 2010 SP2
Topic Last Modified: 2011-02-02
Microsoft Exchange Server 2010 supports an online mailbox move using the New-MoveRequest cmdlet in the Exchange Management Shell. You can move a mailbox from a source Exchange forest to a target Exchange 2010 forest. To run New-MoveRequest, a mail user must exist in the target Exchange forest and the mail user must have a minimum set of required Active Directory attributes.
You can create the required mail user in the target Exchange forest by customizing your Microsoft Identity Lifecycle Manager (ILM) 2007 deployment. The ILM-based rules extension sample code described in this topic demonstrates how to customize your current ILM deployment to create the required mail-enabled users in the target Exchange 2010 forest.
For more information about preparing for cross-forest moves, including descriptions of the required Active Directory attributes, see Prepare Mailboxes for Cross-Forest Move Requests.
Prerequisites
- Download the sample code from the Prepare for Online Mailbox Move page in the Microsoft
Download Center.
- To run the sample code, you need ILM 2007 Feature Pack 1 SP1.
To download the feature pack, see Microsoft Knowledge Base article
977791, Service Pack 1 (build 3.3.1139.2) is available
for Identity Lifecycle Manager 2007 Feature Pack 1.
- You also need the following:
- A source forest running Exchange 2003, Exchange 2007 or
Exchange 2010, where the mailbox currently resides
 Note:
Note:Exchange 2010 doesn't support moving an Exchange 2000 mailbox. - A target forest with Exchange 2010 installed, where the mailbox
will be moved to
- A source forest running Exchange 2003, Exchange 2007 or
Exchange 2010, where the mailbox currently resides
- To connect to the Exchange 2010 target forest, you must have
the appropriate permission to call the UpdateRecipient
cmdlet. To see what permissions you need, see the "Recipient
Provisioning Permissions" section in the Mailbox Permissions
topic.
Contents of Sample Code
In Microsoft Visual Studio 2008, open Microsoft.Exchange.Sample.OneWayGALSync.sln to view the sample code. The sample code includes the following:
- Microsoft.MetadirectoryServicesEx.dll is the binary file that
is shipped with ILM 2007 FP1 SP1 under “\Program Files\Microsoft
Identity Integration Server\Bin\Assemblies”. It's referenced by the
sample code.
- OneWaySync.xml is referenced by the sample code.
- The ILMServerConfig folder contains the ILM configuration files
for the source management agent (MA), target MA, and the ILM
Metaverse (MV).
- Microsoft.Exchange.Sample.OneWayGALSync.MARules.dll and
Microsoft.Exchange.Sample.OneWayGALSync.MVRules.dll (built from the
sample code) are under “\obj\Debug”
Install the ILM sample code
- On the ILM server, copy the following to \Program
Files\Microsoft Identity Integration Server\Extensions:
- OneWaySync.xml
- Microsoft.Exchange.Sample.OneWayGALSync.MARules.dll
- Microsoft.Exchange.Sample.OneWayGALSync.MVRules.dll
- OneWaySync.xml
- Edit the file OneWaySync.xml that you copied to the ILM
Extensions folder in step 1 to specify the distinguishedName (DN)
of the TargetOU container in the target Exchange forest in which
you want to create the mail users. You can use LDP.exe or
ADSIEdit.exe to browse for the TargetOU container if you don’t know
what its name is.
 Note:
Note:If you're using this sample together with ILM GalSync 2007 exclude this container from the list of containers managed by GalSync2007. - On the ILM Identity Manager Console, go to File >
Import Server Configuration to import the ILM server
configuration from the folder ILMServerConfig. This action will
import two Active Directory Management Agents along with the
Metaverse schema and the provisioning rule.
 Note:
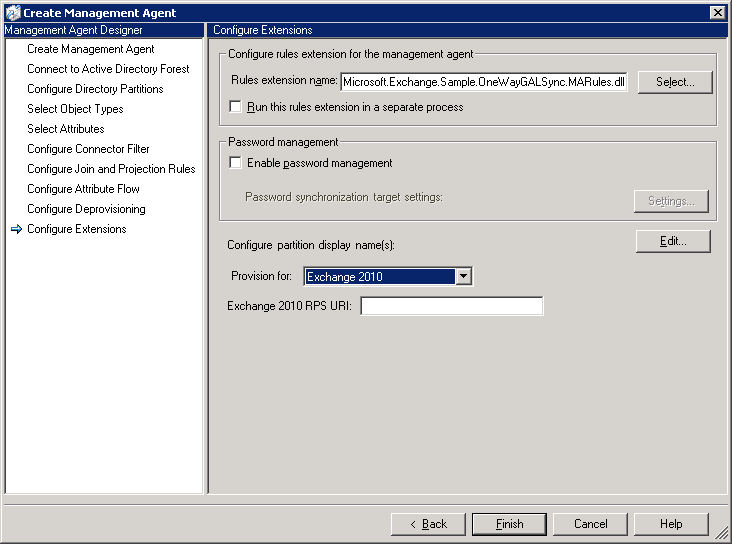
Note:During the import, you must provide the forest name and credentials and match the partitions of the imported Active Directory Management Agent (ADMA) to the partition name in your configuration for both the source and target ADMAs. - For the ADMA to support the Exchange 2010 target forest, on the
Create Management Agent page, on the Configure
Extensions pane, select Exchange 2010 in the
Provision for drop-down and then enter the remote Windows
PowerShell URI of an Exchange 2010 Client Access server in
Exchange 2010 RPS URI.

- On the ILM Identity Manager Console on the Create Management
Agent pane, open the Properties for the Source Forest
Management Agent. Select the Configure Directory Partitions
wizard, and then click Containers to select the container
that will contain the mailboxes you will be moving to the target
forest. Clear the selections for all other containers, that is,
scope the management agent to only manage this one container.
Similarly, for the target forest MA, select the container to which
mail-enabled user's will be provisioned, that is, the TargetOU
specified in step 2.
 Note:
Note:If you're using this sample together with ILM GalSync 2007, exclude both of these containers from the list of containers managed by GalSync 2007. - Perform an initial Full Import (stage only) on the target MAs
so that ILM can discover the TargetOU specified in step 2.
Create Mail User in Target Exchange Forest
Now that you've installed the sample code, use the following procedure to create the required mail user in the target Exchange forest so that New-MoveRequest can be run to perform an online mailbox move.
- In the source forest, use the Exchange Management Console to
create mailbox users in the container selected in step 4 of
"Install the ILM sample code". You can also use Active Directory
Users and Computers to move existing mailbox users to the
container.
- Perform Delta Import and Delta Sync run on the source MA to
discover the mailboxes added to the source container, and provision
mail users to the target MA.
- Perform Export run on the target MA to export the mail users
provisioned in step 1 to the target Active Directory.
- Perform Delta Import on the target MA to confirm the changes
exported in step 2.
- In the target forest, open the Exchange Management Shell and
use the New-MoveRequest cmdlet to move mailboxes from the
source forest.
For more information related to the preceding steps, see the following topics:

