Applies to: Exchange Server 2007 SP3, Exchange Server
2007 SP2, Exchange Server 2007 SP1, Exchange Server 2007
Topic Last Modified: 2007-08-30
In the most common Microsoft Exchange Server 2007 scenario, each user has a single mailbox and each mailbox is accessed by that single user. However, there are many scenarios that require a more advanced configuration of a mailbox. For example:
- Mailboxes for managers who must delegate the management of
their calendars and contacts
- Resource mailboxes that are used for scheduling shared
resources
- Users who must be able to send messages as another user
- Users who want to provide access to their colleagues for
specific folders in their mailboxes
All these scenarios require you to grant additional access permissions. This topic provides an overview of various mailbox access permissions that you can grant to your users.
 Overview of Permissions
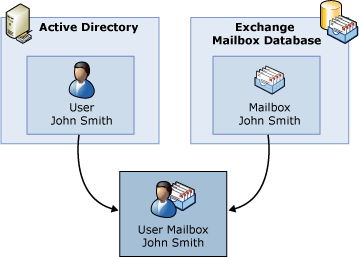
An Exchange mailbox consists of an Active Directory directory service user and the mailbox data that is stored in the Exchange mailbox database (see Figure 1). You can set permissions on both the Active Directory user object and the mailbox object that resides in the Exchange mailbox database. These are known as Active Directory permissions and mailbox permissions respectively. There are different methods to configure each set of permissions. For example, in the Exchange Management Shell, you use the Add-ADPermission cmdlet to assign Active Directory permissions and the Add-MailboxPermission cmdlet to assign mailbox permissions.

You can configure the following mailbox permissions:
- Full Access
- External Account
- Delete Item
- Read Permission
- Change Permission
- Change Owner
In addition to the standard Active Directory permissions that you can configure on any user object, you can grant permissions that apply only to mailbox-enabled users. These additional permission settings are known as extended rights. You can configure the following extended rights for a mailbox-enabled user in Active Directory:
- Send As
- Receive As
- View Information Store Status
 Permissions Managed by End
Users
To a certain extent, mailbox users can personally manage permissions for their own mailboxes. This section discusses two common scenarios in which mailbox users would grant permission to other users.
Delegating Mailbox Management
The manager-delegate scenario is the most common scenario for advanced mailbox configuration. In this scenario, users delegate the management of a certain portion of their mailboxes, typically their calendar and tasks, to their assistant. By default, assistants who are delegated permissions to manage the calendar and task portions of their manager's mailbox can:
- Send messages on behalf of their manager.
- Create and respond to meeting requests.
- View and modify their manager's calendar.
- View and modify their manager's task list.
When a user designates another user as a delegate, the following mailbox permissions are granted to the delegate:
- Send on Behalf permission.
- Editor-level access permissions to the calendar and tasks
folders. This allows the assistant to create, modify, and delete
appointments and tasks in the manager's mailbox.
To use Microsoft Office Outlook to designate another user as a delegate, from the Tools menu, click Options and then use the Delegates tab.
The permissions that a manager can grant to a delegate can be customized to fit a specific need. For example, a manager can grant permissions to an assistant so the assistant can access the manager's Contacts folder in addition to the Calendar and Tasks folders. For more information about configuring mailbox delegation in Office Outlook, see Manage meetings and e-mail for your manager.
Granting Access to Specific Folders in a Mailbox
Mailbox users can also grant other users access to the folders in their mailboxes without designating them as their delegate. When users grant access to one of their folders, the user to whom they granted access can open that folder and access its contents. To learn more about using Outlook to manage folder-level permissions, see Permissions.
You can grant access to the folders in your mailbox by using the Permissions tab of the folder property page.
 Resource Mailboxes
Another common scenario that requires advanced mailbox configuration is using mailboxes for scheduling resources. In Exchange Server 2003, there is no explicit distinction between a standard user mailbox and a mailbox that is used to handle scheduling a resource. Instead, administrators of Exchange 2003 must create a regular user mailbox, and then configure specific permissions to have it function as a resource mailbox. In Exchange 2007, there are two mailbox types that are specifically designed to handle resource scheduling: room mailboxes and equipment mailboxes.
Because room and equipment mailboxes are specifically designed for resource scheduling, their configuration is greatly simplified when compared to how a resource mailbox was provisioned in Exchange 2003. To learn more about configuring resource mailboxes, see Managing Resource Mailboxes and Managing Resource Scheduling.
 Send on Behalf Permission
Granting the Send on Behalf permission to other recipients allows those recipients to send e-mail messages on behalf of a mailbox user. Specifically, recipients who are granted this permission can enter the mailbox user's name in the From field for the messages that they send.
 Note: Note: |
|---|
| The From field is not available in Microsoft Outlook Web Access. Therefore, a user cannot use Outlook Web Access to send messages on behalf of another user, even if the correct permissions are assigned. |
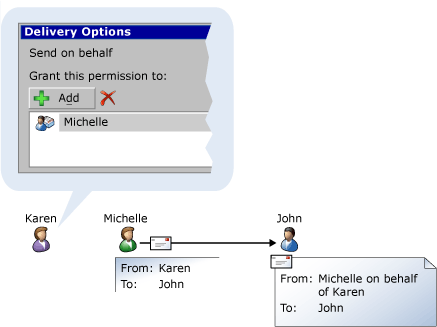
For example, assume that Michelle has been granted the Send on Behalf permission to Karen's mailbox. Michelle sends a message to John with Karen's name in the From field. When John receives the message, it appears as if it was sent by Karen. When John opens the message, the From field in Outlook or Outlook Web Access reads: Michelle on behalf of Karen (see Figure 2).

You can use one of the following methods to grant the Send on Behalf permission to a user:
- In the Exchange Management Console, in the property page
of a mailbox, on the Mail Flow Settings tab,
click Delivery Options.
- In the Exchange Management Shell, use the
Set-Mailbox cmdlet.
- In Outlook, from the Tools menu, click Options
and then use the Delegates tab.
 Note:
Note:If you want to use Outlook to grant the Send on Behalf permission without granting access to any of the mailbox folders, set all the folder permissions to None in the Delegate Permissions dialog box.
 Send As Permission
Granting the Send As permission to other recipients allows those recipients to send e-mail messages as that mailbox user. Like the Send on Behalf right, recipients who are granted this permission can enter the mailbox user's name in the From field for the messages that they send.
 Note: Note: |
|---|
| The From field is not available in Microsoft Outlook Web Access. Therefore, a user cannot use Outlook Web Access to send messages on behalf of another user, even if the correct permissions are assigned. |
There are two differences between the Send As permission and the Send on Behalf permission:
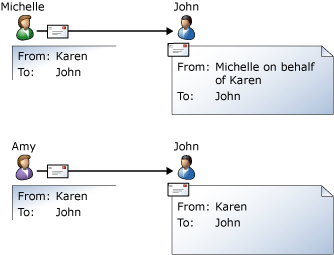
- With the Send As permission, the recipients of a message cannot
identify whether the message was sent by the actual user or another
user that has been granted the Send As permission. Following the
example from the "Send on Behalf Permission" section earlier in
this topic, assume that the user Amy has been granted the Send As
permission to Karen's mailbox. If Michelle (who is granted the Send
on Behalf permission) and Amy send messages to the user John with
Karen's name in the From field, both messages will appear as
if they were sent by Karen. However, when John opens the messages,
he will be able to see that one of them was actually sent by
Michelle on behalf of Karen, but he will not be able to tell that
the other one was actually sent by Amy (see Figure 3).

Figure 3 Comparison of Send As and Send on Behalf rights - Unlike the Send on Behalf permission, end users cannot grant
the Send As permission right by using Outlook. The Send As
permission can only be granted by using one of the following
methods:
- In the Exchange Management Console, use the Manage Send As
Permission wizard.
 Note:
Note:The Manage Send As Permission wizard is introduced in Exchange 2007 Service Pack 1 (SP1). If you are using the release to manufacturing (RTM) version of Exchange 2007, you must use the Exchange Management Shell to manage Send As permissions. - In the Exchange Management Shell, use the
Add-ADPermission cmdlet.
- In the Exchange Management Console, use the Manage Send As
Permission wizard.
For detailed steps about how to grant the Send As permission, see How to Grant the Send As Permission for a Mailbox.
 Receive As Permission
Granting Receive As permission to another user for a mailbox allows that user to log on to the mailbox and have access to the contents of the entire mailbox. The Receive As permission is an extended right for mailbox databases and storage groups in Active Directory as well as mailboxes. Therefore, you can grant a user the Receive As permission for an entire mailbox database or storage group. When you grant a user Receive As permission for an entire mailbox database, that user can log on to all mailboxes that are stored on the mailbox database and access their contents.
To grant the Receive As permission to a mailbox, a mailbox database, or a storage group, you can use the Add-ADPermission cmdlet in the Exchange Management Shell. You cannot use the Exchange Management Console for this task. For detailed steps about how to grant the Receive As permission, see How to Allow Mailbox Access.
 Full Access Permission
Granting this permission to a user for a mailbox allows that user to log on to the mailbox and gain access to the contents of the entire mailbox. Users with the Full Access permission to a mailbox cannot send messages as that mailbox.
To grant the Full Access permission to a mailbox, you can use one of the following methods:
- In the Exchange Management Console, use the Manage Full
Access Permission wizard.
 Note:
Note:The Manage Full Access Permission wizard is introduced in Exchange 2007 SP1. If you are using the RTM version of Exchange 2007, you must use the Exchange Management Shell to manage the Full Access permission. - In the Exchange Management Shell, use the
Add-MailboxPermission cmdlet.
For detailed steps about how to grant the Full Access permission to a mailbox, see How to Allow Mailbox Access.
 For More Information
For more information about planning permissions, see Permission Considerations.
For more information about configuring permissions, see Configuring Permissions.
To learn more about mailboxes, see Understanding Recipients.

