

Topic Last Modified: 2011-03-17
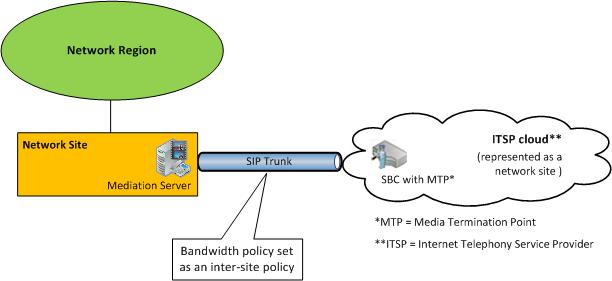
To deploy call admission control (CAC) on a SIP trunk, you create a network site to represent the Internet telephony service provider (ITSP). To apply bandwidth policy values on the SIP trunk, you create an inter-site policy between the network site in your enterprise and the network site that you create to represent the ITSP.
The following figure shows an example CAC deployment on a SIP trunk.
To configure CAC on a SIP trunk, you will have to perform the following tasks during CAC deployment:
- Create a network site to represent the ITSP. Associate the
network site to an appropriate network region, and allocate
bandwidth of zero for audio and video for this network site. For
details, see Configure Network Sites
for CAC in the Deployment documentation.
 Note:
Note:For the ITSP, this network site configuration is not functional. Bandwidth policy values are actually applied in step 2. - Create an inter-site link for the SIP trunk using the relevant
parameter values for the site you created in step 1. For example,
use the name of the network site in your enterprise as the value of
the NetworkSiteID1 parameter, and the ITSP network site as the
value of the NetworkSiteID2 parameter. For details, see Create Network Intersite
Policies in the Deployment documentation. Also see the Lync
Server Management Shell documentation for the
New-CsNetworkInterSitePolicy cmdlet.
- Get the IP address of the Session Border Controller’s (SCB)
Media Termination Point from your ITSP. Add that IP address with a
subnet mask of 32 to the network site that represents the ITSP. For
details, see Associate a Subnet with
a Network Site.