 See Also

Topic Last Modified: 2011-04-14
To successfully complete this procedure you should be logged on as a user who is a member of the RTCUniversalServerAdmins group or have the correct permissions delegated. For details about delegating permissions, see Delegate Setup Permissions. Depending on your organization and requirements for requesting certificates, you may require other group memberships. Consult with the group that manages your public key infrastructure (PKI) certification authority (CA).
 Note: Note: |
|---|
| Lync Server 2010 includes support for SHA-256 certificates for connections from clients running the Windows Vista, Windows Server 2008, Windows Server 2008 R2, and Windows 7 operating systems, in addition to Lync 2010 Phone Edition. To support external access using SHA-256, the external certificate is issued by a public CA using SHA-256. |
Each Front End Server requires up to three certificates, a default certificate, a web internal certificate, and a web external certificate. However, it is possible to request and assign a single default certificate with appropriate subject alternative name entries. For details about the certificate requirements, see Certificate Requirements for Internal Servers. Use the following procedure to request, assign, and install the Front End Server certificates. Repeat the procedure for each Front End Server.
| Note: |
|---|
| In the default configuration process, there is only one certificate requested. The certificate that is received is then assigned to the Front End Server. The certificate will be assigned to Front End Server roles, and also to the web services hosted on the Front End Server. |
 Important: Important: |
|---|
| The following procedure describes how to configure certificates from an internal enterprise PKI deployed by your organization and with offline request processing. For information about obtaining certificates from a public CA, see Certificate Requirements for Internal Servers in the Planning documentation. Also, this procedure describes how to request, assign, and install certificates during set up of the Front End Server. If you requested certificates in advance, as described in the Request Certificates in Advance (Optional) section of this Deployment documentation, or you do not use an internal enterprise PKI deployed in your organization to obtain certificates, you must modify this procedure as appropriate. |
 To configure certificates for a
Front End Server
To configure certificates for a
Front End Server
-
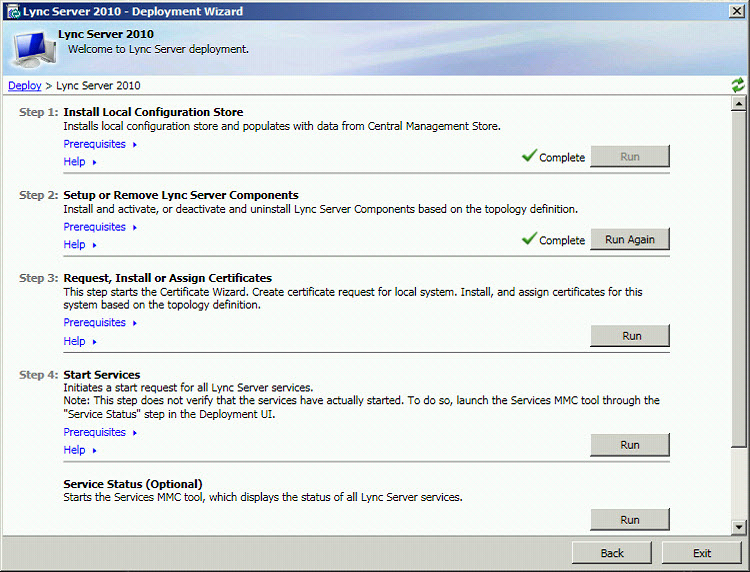
In the Lync Server Deployment Wizard, click Run next to Step 3: Request, Install or Assign Certificates.
-
On the Certificate Wizard page, click Request.

-
On the Certificate Request page, click Next.
-
On the Delayed or Immediate Requests page, you can accept the default Send the request immediately to an online certification authority option by clicking Next. The internal CA with automatic online enrollment must be available if you select this option. If you choose the option to delay the request, you will be prompted for a name and location to save the certificate request file. The certificate request must be presented and processed by a CA either inside your organization, or by a public CA. You will then need to import the certificate response and assign it to the proper certificate role.

-
On the Choose a certificate Authority (CA) page, select the Select a CA from the list detected in your environment option, and then select a known (through registration in Active Directory Domain Services (AD DS)) CA from the list. Or, select the Specify another certification authority option, enter the name of another CA in the box, and then click Next.

-
On the Certificate Authority Account page, you are prompted for credentials to request and process the certificate request at the CA. You should have determined if a user name and password is necessary to request a certificate in advance. Your CA administrator will have the required information and may have to assist you in this step. If you need to supply alternate credentials, select the check box, provide a user name and password in the text boxes, and then click Next.

-
On the Specify Alternate Certificate Template page, to use the default Web Server template, click Next.
Note:If your organization has created a template for use as an alternative for the default Web server CA template, select the check box, and then enter the name of the alternate template. You will need the template name as defined by the CA administrator. 
-
On the Name and Security Settings page, specify a Friendly Name that should allow you to identify the certificate and purpose. If you leave it blank, a name will be generated automatically. Set the Bit length of the key, or accept the default of 2048 bits. Select the Mark the certificate’s private key as exportable if you determine that the certificate and private key needs to be moved or copied to other systems, and then click Next.
Note:Lync Server 2010 has minimal requirements for an exportable private key. One such place is on the Edge Servers in a pool, where the Media Relay Authentication Service uses copies of the certificate, rather than individual certificates for each instance in the pool. 
-
On the Organization Information page, optionally provide organization information, and then click Next.
-
On the Geographical Information page, optionally provide geographical information, and then click Next.
-
On the Subject Name / Subject Alternate Names page, review the subject alternative names that will be added, and then click Next.

-
On the SIP Domain setting page, select the SIP Domain, and then click Next.

-
On the Configure Additional Subject Alternate Names page, add any additional required subject alternative names, including any that might be required for additional SIP domains in the future, and then click Next.

-
On the Certificate Request Summary page, review the information in the summary. If the information is correct, click Next. If you need to correct or modify a setting, click Back to the proper page to make the correction or modification.

-
On the Executing Commands page, click Next.

-
On the Online Certificate Request Status page, review the information returned. You should note that the certificate was issued and installed into the local certificate store. If it is reported as having been issued and installed, but is not valid, ensure that the CA root certificate has been installed in the server’s Trusted Root CA store. Refer to your CA documentation on how to retrieve a Trusted Root CA certificate. If you need to view the retrieved certificate, click View Certificate Details. By default, the check box for Assign the certificate to Lync Server certificate usages is checked. If you want to manually assign the certificate, clear the check box, and then click Finish.

-
If you cleared the check box for Assign the certificate to Lync Server certificate usages on the previous page, you will be presented with the Certificate Assignment page. Click Next.

-
On the Certificate Store page, select the certificate that you requested. If you want to view the certificate, click View Certificate Details, and then click Next to continue.
Note:If the Online Certificate Request Status page reported an issue with the certificate, such as the certificate not being valid, viewing the actual certificate can assist in resolving the issue. Two specific issues that can cause a certificate to not be valid is the previously mentioned missing Trusted Root CA certificate, and a missing private key that is associated with the certificate. Refer to your CA documentation to resolve these two issues. 
-
On the Certificate Assignment Summary page, review the information presented to ensure that this is the certificate that should be assigned, and then click Next.

-
On the Executing Commands page, review the output of the command. Click View Log if you want to review the assignment process or if there was an error or warning issued. When you are finished with your review, click Finish.

-
On the Certificate Wizard page, verify that the Status of the certificate is “Assigned,” and then click Close.
