

Topic Last Modified: 2011-03-23
This topic describes how to use the DHCPUtil.
 DHCPConfigScript.bat
DHCPUtil does not configure the DHCP servers by itself. It delegates that responsibility to a script which can be changed to suit the organization’s need. After it calculates the values for various options, DHCPUtil passes these values to a script, which can then take appropriate action.
DHCPConfigScript.bat is one such script and is the one that ships with DHCPUtil. (It can be found in the same location as DHCPUtil.) This script uses netsh dhcp server commands that configure DHCP server with the options required for Microsoft Lync Server 2010 deployment.
 Note: Note: |
|---|
| DHCPConfigScript.bat cannot be used against any DHCP server other than the DHCP server feature included with Windows Server operating systems, unless you modify it. |
Here is what the script contains:
 Copy Code Copy Code |
|
|---|---|
netsh dhcp server delete optionvalue 120 netsh dhcp server delete optiondef 120 netsh dhcp server delete class MSUCClient if /i %1 EQU Cleanup goto :EOF netsh dhcp server add optiondef 120 UCSipServer Binary 0 comment="Sip Server Fqdn" netsh dhcp server set optionvalue 120 Binary %3 netsh dhcp server add class MSUCClient "UC Vendor Class Id" "%2" 1 netsh dhcp server add optiondef 1 UCIdentifier Binary 0 Vendor=MSUCClient comment="UC Identifier "netsh dhcp server set optionvalue 1 Binary vendor=MSUCClient %4 netsh dhcp server add optiondef 2 URLScheme Binary 0 Vendor=MSUCClient comment="URL Scheme" netsh dhcp server set optionvalue 2 Binary vendor=MSUCClient %5 netsh dhcp server add optiondef 3 WebServerFqdn Binary 0 Vendor=MSUCClient comment="Web Server Fqdn" netsh dhcp server set optionvalue 3 Binary vendor=MSUCClient %6 if nt %7 == NULL (netsh dhcp server add optiondef 4 WebServerPort Binary 0 Vendor=MSUCClient comment="Web Server Port") if not %7 == NULL (netsh dhcp server set optionvalue 4 Binary vendor=MSUCClient %7) netsh dhcp server add optiondef 5 CertProvRelPath Binary 0 Vendor=MSUCClient comment="Cert Prov Relative Path" netsh dhcp server set optionvalue 5 Binary vendor=MSUCClient %8 |
|
The first three commands clean up a DHCP server so that values for various options can be set properly. If the script is run in cleanup mode, no further action is taken. Otherwise, the definition for option 120 is created and set to the supplied value.
Next, a vendor with vendor class identifier MS-UC-Client (%2 will always have this value) is created. Then, the script sets sub-options for option 43 one at a time. You will notice that the following sub-options are created for the vendor class:
| Copy Code |
|
|---|---|
netsh dhcp server add optiondef 3 WebServerFqdn Binary 0 Vendor=MSUCClient comment="Web Server Fqdn" |
|
For details about netsh dhcp, see Deploying Lync 2010 Phone Edition, Configuring DHCP Options to Enable Sign-in for IP Phones, and the MSDN Library at http://go.microsoft.com/fwlink/?LinkId=205011.
Configuring DHCP Server by Using DHCPUtil
At the command prompt, run:
| Copy Code |
|
|---|---|
DHCPUtil -SipServer <FQDN of the Sip Server> [-WebServer <FQDN of the web server> | - |
|
Only the last parameter RunConfigScript is not part of DHCPConfigScript.bat. This parameter causes DHCPUtil to generate the values for option 120 and 43 and then pass the values to the configuration script. If RunConfigScript is specified without any path, then DHCPConfigScript.bat is run. If a valid file path is specified, then that file is run. This file can be a script or an executable.
The following parameters are passed to the script, in this order:
- Mode: Possible values are Cleanup and Configure
- Value of the vendor class identifier
- Value of option 120
- Value of sub-option 1 for option 43
- Value of sub-option 2 for option 43
- Value of sub-option 3 for option 43
- Value of sub-option 4 for option 43
- Value of sub-option 5 for option 43
Administrators can use the content in this topic to write custom scripts. For example, to configure a DHCP server, the following command needs to be run on the DHCP server:
| Copy Code |
|
|---|---|
DHCPUtil.exe -SipServer sip.contoso.com -WebServer web.contoso.com -RunConfigScript |
|
This will invoke DHCPConfigScript.bat with the appropriate parameters, which in turn will invoke various netsh dhcp server commands.
You might also want to edit DHCPConfigScript.bat (or, write a different one) so that it can run netsh commands to a remote DHCP server, thus removing the need to run DHCPUtil on the DHCP server itself.
Testing DHCP Server Configuration
DHCPUtil can also be used to test the configuration on DHCP server. In this scenario, DHCPUtil sends out DHCP packets, as Lync Server 2010 clients would do, and then parses the received packet. If an appropriate response is received, the retrieved values are shown as follows:
| Copy Code |
|
|---|---|
DHCPUtil -EmulateClient |
|
Note that this may require appropriate exclusions in the firewall and that, in general, this will not work if run on the DHCP server. It should be run on a computer that is served by the DHCP server whose configuration is to be tested.
To enable exclusions, run the following commands from an administrator command prompt:
| Copy Code |
|
|---|---|
netsh advfirewall firewall add rule name="DHCPClientIn" dir=in action=allow localport=68 protocol=udp |
|
After you are done, you can run the following commands (from an elevated command prompt) to remove the exclusions:
| Copy Code |
|
|---|---|
netsh advfirewall firewall delete rule name="DHCPClientIn" |
|
| Copy Code |
|
|---|---|
Output: Starting Discovery Sending Packet (Size: 280, Network Adapter: 192.168.0.244, Attempt Type: Broadcast only) --Begin Packet-- DHCP: INFORM (xid=D2FFB17A) DHCP: Op Code (op) = 1 DHCP: Hardware Type (htype) = 6 DHCP: Hops (hops) = 0 DHCP: Transaction ID (xid) = 3539972474 DHCP: Seconds (secs) = 0 DHCP: Flags (flags) = 0000 DHCP: Client IP Address (ciaddr) = 192.168.0.244 DHCP: Your IP Address (yiaddr) = 0.0.0.0 DHCP: Server IP Address (siaddr) = 0.0.0.0 DHCP: Relay IP Address (giaddr) = 0.0.0.0 DHCP: Client HW Address (chaddr) = 122222222222 DHCP: Server Host Name (sname) = DHCP: Boot File Name (file) = DHCP: Magic Cookie = 99.130.83.99 DHCP: Option Field DHCP: DHCP MESSAGE TYPE( 53) = (Length: 1) DHCP INFORM DHCP: Server Identifier( 54) = (Length: 0) 0.0.0.0 DHCP: Client Identifier( 61) = (Length: 7) """"" (01122222222222) DHCP: SIP Server( 120) = (Length: 0) enc:0 () DHCP: Host Name( 12) = (Length: 6) Client DHCP: Vendor Identifier( 60) = (Length: 12) MS-UC-Client DHCP: Param Req List( 55) = (Length: 2) 120 43 DHCP: Vendor Info( 43) = (Length: 0) () DHCP: End of this option field --End Packet-- Received Packet Sender:192.168.0.238:67, Size:365 --Begin Packet-- DHCP: ACK (xid=D2FFB17A) DHCP: Op Code (op) = 1 DHCP: Hardware Type (htype) = 6 DHCP: Hops (hops) = 0 DHCP: Transaction ID (xid) = 3539972474 DHCP: Seconds (secs) = 0 DHCP: Flags (flags) = 0000 DHCP: Client IP Address (ciaddr) = 192.168.0.244 DHCP: Your IP Address (yiaddr) = 0.0.0.0 DHCP: Server IP Address (siaddr) = 0.0.0.0 DHCP: Relay IP Address (giaddr) = 0.0.0.0 DHCP: Client HW Address (chaddr) = 122222222222 DHCP: Server Host Name (sname) = DHCP: Boot File Name (file) = DHCP: Magic Cookie = 99.130.83.99 DHCP: Option Field DHCP: DHCP MESSAGE TYPE( 53) = (Length: 1) DHCP ACK DHCP: Server Identifier( 54) = (Length: 4) 192.168.0.238 DHCP: Client Identifier( 61) = (Length: 0) () DHCP: SIP Server( 120) = (Length: 18) enc:0 sip.contoso.com (0003736970076578616D706C6503636F6D00) DHCP: Host Name( 12) = (Length: 0) DHCP: Vendor Identifier( 60) = (Length: 0) DHCP: Param Req List( 55) = (Length: 0) 0 0 DHCP: Vendor Info( 43) = (Length: 87) MS-UC- Clienthttps web.contoso.com 443/CertProv/CertProvisioningService.svcÜ NAP (010C4D532D55432D436C69656E7402056874747073030F7765622E6578616D706C652E636F6D040334343305252F4365727450726F762F4365727450726F766973696F6E696E67536572766963652E737663DC034E4150) DHCP: End of this option field --End Packet-- Result: Success DHCP Server : 192.168.0.238 Sip Server : sip.contoso.com CertProv Url : https://web.contoso.com:443/CertProv/CertProvisioningService.svc |
|
When there is a success result, the output shows the DHCP server that responded, the value for SIP server, and the certificate provisioning service URL.
Configuring DHCP Servers Manually
After you have the values for various options (generated using DHCPUtil), you need to manually perform the same tasks that the script does using netsh dhcp server commands.
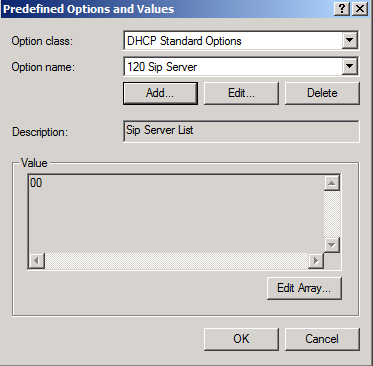
To create the definition for option 120
- Open the DHCP Management console.
- Go to appropriate domain.
- Right click IPv4.
- Click Set Predefined Options to open the Predefined
Options and Values dialog box.
- Click Add to open the Option Type dialog box.
- Do the following:
- In Name, type the SIP server name.
- In Data type, click Binary.
- In Code, type 120.
- In Description, type SIP Server List.
- In Name, type the SIP server name.
- Click OK to accept and close the dialog box.
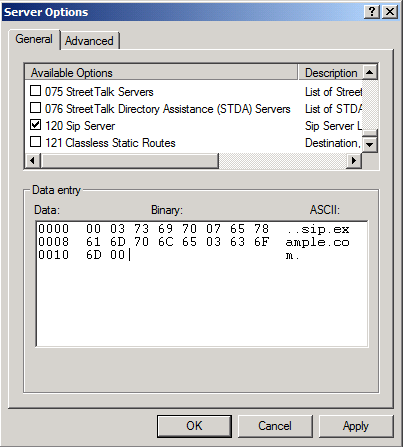
To set the value for option 120
- In the navigation tree, under IPv4, click Server
Options.
- Right click Server Options, and click Configure
Options to open the Server Options dialog box.
- Select the 120 Sip Server check box. This allows you to
edit the value in the Data Entry box.
- Carefully enter the value generated by DHCPUtil.
- Click OK to accept and close the dialog box.
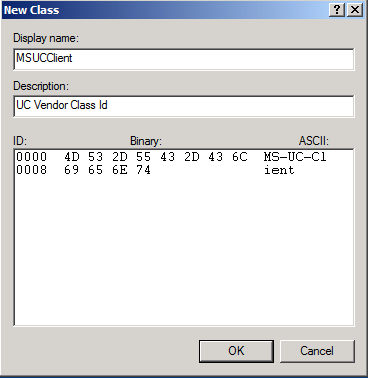
To create a new vendor class with the value MS-UC-Client
- Right click IPv4 again, and click Define Vendor
Classes… to open the DHCP Vendor Classes dialog box.
- Click Add to open the New Class dialog box.
- Do the following:
- In Display Name, type MSUCClient.
- In Description, type the UC Vendor Class Id.
- Under ASCII, click MS-UC-Client.
- In Display Name, type MSUCClient.
- Click OK to accept and close the dialog box.
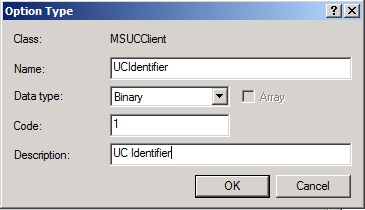
To create a definition for each of the sub-options in option 43, for the vendor class created in the previous procedure
- Right-click IPv4, and click Set Predefined
Options to open the Predefined Options and Values dialog
box.
- In Option Class, click MSUCClient.
- Click Add to open the Option Type dialog box.
- Do the following: (the following example is only for sub-option
1)
- In Name, type UCIdentifier.
- In Data type, click Binary. (This is true for all
five sub-options.)
- In Code, click 1. (Other sub-options will have
corresponding code, such as 2, 3, 4 or 5.)
- In Description, type UC Identifier.
- In Name, type UCIdentifier.
- Click ‘OK’ to accept and close the dialog box.
- Repeat this process for all five sub-options.
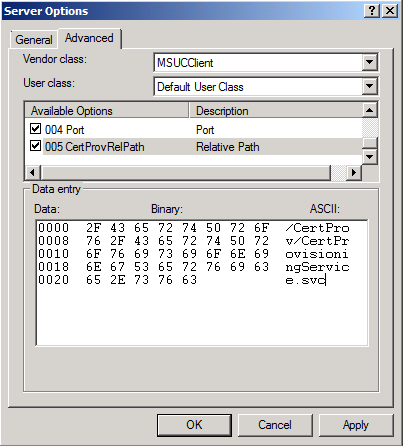
To set the values for each of the sub-options
- Under IPv4, click Server Options.
- Right-click Server Options, and click Configure
Options to open Server Options dialog box.
- Click the Advanced tab.
- In the Vendor class box, click MSUCClient.
- Check each sub-option, and fill in appropriate values.
- Click OK to accept values and close the dialog box.
Manual configuration of the DHCP server is now complete. You can test the configuration using DHCPUtil –EmulateClient.
Cleaning up Lync Server 2010 Related Configuration from DHCP Server
Use the DHCPUtil command DHCPUtil –CleanDHCPConfig to clean up Lync Server configuration information from the DHCP server.
This command should be run on the DHCP server and requires that DHCPConfigScript.bat be in the same directory as DHCPUtil. As is the case with RunConfigScript, administrators can modify DHCPConfigScript.bat so that the netsh commands are issued to remote DHCP servers. This removes the need to run DHCPUtil on the DHCP server itself.
To clean up the configuration manually, the DHCP server administration console can be used. The value for option 120 and new vendor class and various sub-options for option 43 (corresponding to Vendor MS-UC-Client) are needed to clean up configuration.
Enabling Lync Server 2010, DHCP Server
Microsoft Lync Server 2010, DHCP Server does not participate in the IP acquisition process and can be used alongside with other DHCP servers in your organization. To enable Lync Server 2010, DHCP Server on a single Registrar, run this command:
| Copy Code |
|
|---|---|
Set-CSRegistrarConfiguration -Identity <Service Identity of the Registrar> -EnableDHCPServer $true |
|
If service-level Registrar configuration for this Registrar doesn’t exist, run this cmdlet too:
| Copy Code |
|
|---|---|
New-CSRegistrarConfiguration -Identity <Service Identity of the Registrar> -EnableDHCPServer $true |
|
To disable the Set-CSRegistrarConfiguration cmdlet can be used again – this time the value for EnableDHCPServer should be $false.
| Copy Code |
|
|---|---|
Configuring Microsoft BOOT Relay Agents
For details, see Configure the DHCP Relay Agent at http://go.microsoft.com/fwlink/?LinkId=205013.
The following two pages in the TechNet Library are particularly useful:
- "Configure global DHCP Relay Agent properties" at http://go.microsoft.com/fwlink/?LinkId=205015
- "Enable the DHCP Relay Agent on a router interface" at http://go.microsoft.com/fwlink/?LinkId=205016
Make sure that the Boot Threshold and Hop Count Threshold are configured properly, otherwise the relay agent will drop the packets.
The packets sent by Lync Server Clients have the secs parameter (seconds elapsed since the client started discovery process; for details, see RFC 2131) set to 0, so Boot Threshold in the DHCP relay agents must be set to 0.