

Topic Last Modified: 2014-02-05
If you are using Windows Server 2012, Windows Server 2012 R2, Windows 8, or Windows 8.1 you should already have Windows PowerShell 3.0. That’s because this application comes preinstalled with those operating systems.
If you are running Windows 7 or Windows Server 2008 R2, you might also be running Windows PowerShell 3.0. However, it’s also possible that you might be running version 2.0 instead—the version that originally shipped with those operating systems. To determine which version of Windows PowerShell you are using, do the following on your Windows 7 or Windows Server 2008 R2 computer:
-
Click Start, click All Programs, click Accessories, click Windows PowerShell, and then click Windows PowerShell.
-
In the Windows PowerShell console, type the following command and then press ENTER:
 Copy Code
Get-Host | Select-Object Version
-
Information similar to the following should then be displayed in the console window:
Copy CodeVersion ------- 3.0
If the returned Version number is 3.0, then you are running Windows PowerShell 3.0. If the returned Version number is not 3.0, then you'll need to install Windows PowerShell 3.0. You can download Windows Management Framework 3.o, which includes Windows PowerShell 3.0, from the Microsoft Downloads Center.
After you've verified that Windows PowerShell 3.0 is installed, you must make sure that Windows PowerShell has been configured for running remote scripts. To do that, start Windows PowerShell as an administrator. On Windows 7, Windows Server 2008 R2, Windows Server 2012, or Windows Server 2012 R2 do the following:
-
Click Start, click All Programs, click Accessories, click Windows PowerShell, right-click Windows PowerShell, and then click Run as administrator.
-
If the User Account Control dialog box appears, click Yes to verify that you want to run Windows PowerShell under administrator credentials.
If you are running Windows 8, complete this procedure instead:
-
Access the Charms bar, click Search, and then right-click Windows PowerShell. You can quickly access the Charms bar on any Windows 8 computer (touch screen or non-touch screen) by holding down the Windows key and pressing C.
-
In the toolbar at the bottom of the screen, click Run as administrator.
-
If the User Account Control dialog box appears, click Yes to verify that you want to run Windows PowerShell under administrator credentials.
After Windows PowerShell is running, you must change the execution policy to allow the running of remote scripts. In the Windows PowerShell console, type the following command and then press ENTER:
| Copy Code |
|
|---|---|
Set-ExecutionPolicy RemoteSigned -Force |
|
 Note: Note: |
|---|
| When you run the preceding command, you might receive the
following error message: Set-ExecutionPolicy : Access to the registry key'HKEY_LOCAL_MACHINE\SOFTWARE\Microsoft\PowerShell\1\ShellIds\Micrsoft.PowerShell' is denied. This error message typically occurs if you are not running Windows PowerShell under administrator credentials. Close your session of Windows PowerShell, and start a new session as an administrator. |
To verify that the execution policy has been configured correctly, type the following at the Windows PowerShell prompt and then press ENTER:
| Copy Code |
|
|---|---|
Get-ExecutionPolicy |
|
If you get back the following value, then everything has been configured correctly:
| Copy Code |
|
|---|---|
RemoteSigned |
|
If you are not currently running Windows PowerShell 3.0, you'll also need to download and install Windows Management Framework 3.0 from the Microsoft Download Center. This is an installation package that includes Windows PowerShell 3.0 and Windows Remote Management (WinRM) 3.0. This installation package might be required if you are running Windows 7 and have not yet updated to Windows PowerShell 3.0. If you are running Windows Server 2012, Windows Server 2012 R2, Windows 8, or Windows 8.1, there should be no need to install Windows PowerShell 3.0. Windows PowerShell 3.0 comes preinstalled on those operating systems.
Before installing Windows Management Framework 3.0:
-
Make sure you have downloaded the correct version of the installation package. If you are running the 64-bit version of Windows 7, download the file Windows6.1-KB2506143-x64.msu. If you are running the 32-bit version of Windows 7, download the file Windows6.1-KB2506143-x86.msu.
-
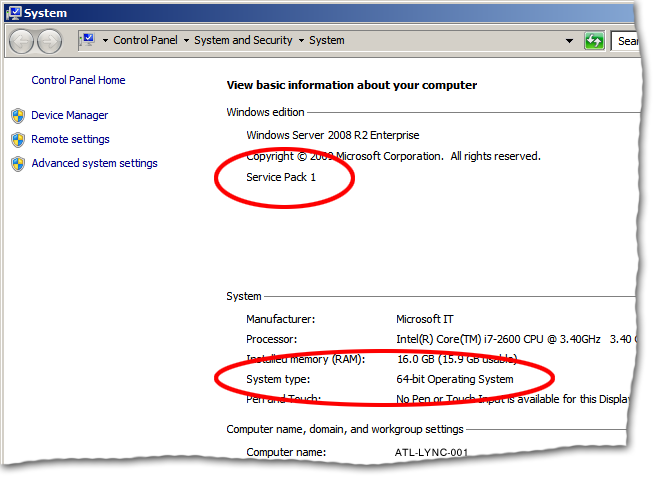
If you are running Windows 7 on your computer, make sure that you have installed Windows 7 Service Pack 1.
If you aren’t sure which version of Windows you are running, or you aren’t sure if you've installed Windows 7 Service Pack 1, click Start, right-click Computer, and then click Properties. This information will be reported in the System dialog box:
To install Windows Management Framework 3.0, complete the following procedure:
-
Double-click the .MSU installation file (either Windows6.1-KB2506143-x64.msu or Windows6.1-KB2506143-x86.msu).
-
In the Download and Install Updates wizard, on the Read these license terms (1 of 1) page, click I Accept.
-
When installation is complete, click Restart Now to restart your computer.
After the computer has rebooted, verify that Windows PowerShell can start and that the application can be run under administrative credentials. To do this:
-
Click Start, click All Programs, click Accessories, click Windows PowerShell, right-click Windows PowerShell and then click Run as administrator.
-
If the User Account Control dialog box appears, click Yes to verify that you want to run Windows PowerShell under administrator credentials.
When the Windows PowerShell console appears, you should then verify that the WinRM service is running and has been configured correctly. To verify that the service is running, type the following command at the Windows PowerShell prompt and then press ENTER:
| Copy Code |
|
|---|---|
Get-Service winrm |
|
Information about the WinRM service will then be displayed on screen:
| Copy Code |
|
|---|---|
Status Name DisplayName ------ ---- ----------- Running winrm Windows Remote Management (WS-Manag... |
|
If the service Status does not equal “Running”, start the WinRM service by typing the following command and then pressing ENTER:
| Copy Code |
|
|---|---|
Start-Service winrm |
|
After the service has started, run the following command to make sure that WinRM is using Basic authentication:
| Copy Code |
|
|---|---|
winrm set winrm/config/client/auth '@{Basic="True"}'
|
|
Information similar to the following will be displayed onscreen:
| Copy Code |
|
|---|---|
Auth Basic = true Digest = true Kerberos = true Negotiate = true Certificate = true CredSSP = false |
|
If basic authentication has been set to true, then you are ready to use Windows PowerShell to connect to Lync Online.