Applies to: Exchange Server 2010 SP3, Exchange Server 2010 SP2
Topic Last Modified: 2010-07-27
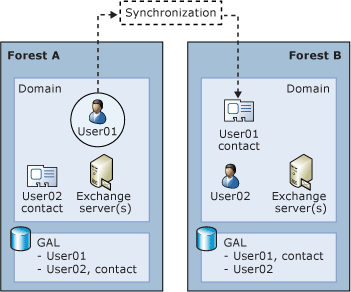
This topic explains how to deploy Exchange 2010 in a cross-forest topology using Service Pack 1 (SP1) for ILM 2007 Feature Pack 1 (FP1). To deploy Exchange 2010 in a cross-forest topology, you must first install Exchange 2010 in each forest, and then connect the forests so that users can see address and availability data across the forests.

This topic does not describe how to deploy Exchange 2010 in a dedicated Exchange forest (or resource forest) topology. For more information about how to deploy Exchange 2010 in a resource forest topology, see Deploy Exchange 2010 in an Exchange Resource Forest Topology.
To synchronize the GALs in Exchange 2010, we recommend that you use Service Pack 1 (SP1) for ILM 2007 Feature Pack 1 (FP1). To download the feature pack, see Microsoft Knowledge Base article 977791, Service Pack 1 (build 3.3.1139.2) is available for Identity Lifecycle Manager 2007 Feature Pack 1.
Prerequisites
To perform the following procedure in Exchange 2010, confirm the following:
- You have correctly configured Domain Name System (DNS) for name
resolution across forests in your organization. To verify that DNS
is configured correctly, use the Ping tool to test connectivity to
each forest from the other forests in your organization and from
the server on which you will run the GALSync agent.
- The GALSync management agent (MA) communicates with the
Exchange 2010 forest using Windows PowerShell V2.0 RTM. Make sure
Windows PowerShell v1.0 isn't installed on this computer by going
to Control Panel, and then clicking Programs and Features.
- Ensure that Windows Remote Management has not been installed by
Windows Update.
- Install Windows PowerShell and Windows Remote Management. For
details, see Microsoft Knowledge Base article 968930, Windows Management Framework Core package
(Windows PowerShell 2.0 and WinRM 2.0).
Deploy Exchange 2010 in a cross-forest topology with SP1 for ILM 2007 FP1
- In each forest, install Exchange 2010 separately. To install
Exchange 2010, perform the same steps that you would if you were
installing Exchange 2010 in a single forest topology. For detailed
steps, see one of the following topics:
- Install
Exchange Server 2010
- Install
Exchange 2010 Using the Custom Installation Type
 Note:
Note:This topic assumes that you don't have an existing Exchange 2007 or Exchange Server 2003 topology. If you do have an existing Exchange topology and you want to upgrade, see Understanding Upgrade to Exchange 2010.
- Install
Exchange Server 2010
- In each forest, use Active Directory Users and Computers to
create a container in which ILM will create contacts for each
mailbox from the other forest. We recommend that you name this
container FromILM. To create the container, select the
domain in which you want to create the container, right-click the
domain, select New, and then select Organizational
Unit. In New Object - Organizational Unit, type
FromILM, and then click OK.
- Create a GALSync management agent for each forest by using ILM
2007 Feature Pack 1. This allows you to synchronize the users in
each forest and create a common GAL. For detailed steps, see the
procedure "Configure a GAL Synchronization management agent with
SP1 for ILM 2007 FP1" later in this topic.
- Enable GALSync. To do this, in the main ILM Identity Manager
window, click Tools, click Options, and then select
the Enable Provisioning Rules Extension check box. Click
OK.
- Create an SMTP Send connector in each of the forests. For
detailed steps, see Configure Cross-Forest
Connectors.
- In each forest, enable the Availability service so that users
in each forest can view free/busy data about users in the other
forest. For more information, see Managing the
Availability Service.
 Note:
Note:The Availability service is supported only for Office Outlook 2007 clients. - If you require that mail can be relayed through any forest in
your organization, you must configure a domain in that forest as an
authoritative domain. For detailed steps, see Configure Exchange 2010
to Accept E-Mail for More Than One Authoritative Domain.
- Move mailboxes from your existing Exchange 2003 or Exchange
2007 servers to the new Exchange 2010 Mailbox servers in each
forest. For detailed steps, see Create a Remote Legacy
Move Request Where One of the Forests Doesn't Have Exchange
2010.
Configure a GAL Synchronization management agent with SP1 for ILM 2007 FP1
This procedure is necessary for deployment of Exchange 2010 in a cross-forest topology using Service Pack 1 (SP1) for ILM 2007 Feature Pack 1 (FP1). See step 3 in "Deploy Exchange 2010 in a cross-forest topology with SP1 for ILM 2007 FP1" earlier in this topic.
- In SP1 for ILM 2007 FP1, select Management Agents from
the toolbar, and then under Actions, click
Create.
- On the Create Management Agent page, under Management
agent for, select Active Directory global address list
(GAL).
- In the Name box, type a name for this management agent.
When creating the name, we recommend that you include the name of
the source forest from which this management agent will gather
recipient information.
- In the Description box, type a description for this
management agent, and then click Next.
- On the Connect to Active Directory Forest page, complete
the following fields:
- Forest name Name of the source
forest.
- User name and Password User name
and password of an account that has permission to read schema
information from the source forest.
- Domain Domain for the specified
account.
 Note:
Note:You can also enter the user name as <user>@<domain> and leave the domain field blank.
- Forest name Name of the source
forest.
- Click Next.
- On the Configure Directory Partitions page, select the
directory partitions on the source forest from which you want to
project data to a destination forest.
- On the Configure Directory Partitions page, click
Containers.
- On the Select Containers page, clear the top-level check
box for the directory partition, select the containers for which
this management agent will gather and store information, and then
click OK. Be sure to select the container in which ILM will
create contacts for each mailbox from the other forest, such as the
FromILM container.
- On the Configure Directory Partitions page, click
Next.
- On the Configure GAL page, click Target, and then
select the container in which the contacts from other forests will
reside in the target forest.
- On the Configure GAL page, click Source, and then
select the container in which other forests' objects that are
synchronized to the target forest will reside.
- Under Exchange configuration, click Edit to
specify at least one Simple Mail Transfer Protocol (SMTP) e-mail
suffix that is managed in the source forest. Click Next.
- On the Select Object Types page, click Next.
- On the Select Attributes page, click Next.
- On the Configure Connector Filter page, click
Next.
- On the Configure Join and Projection Rules page, click
Next.
- On the Configure Attributes Flow page, click
Next.
- On the Configure Deprovisioning page, click
Next.
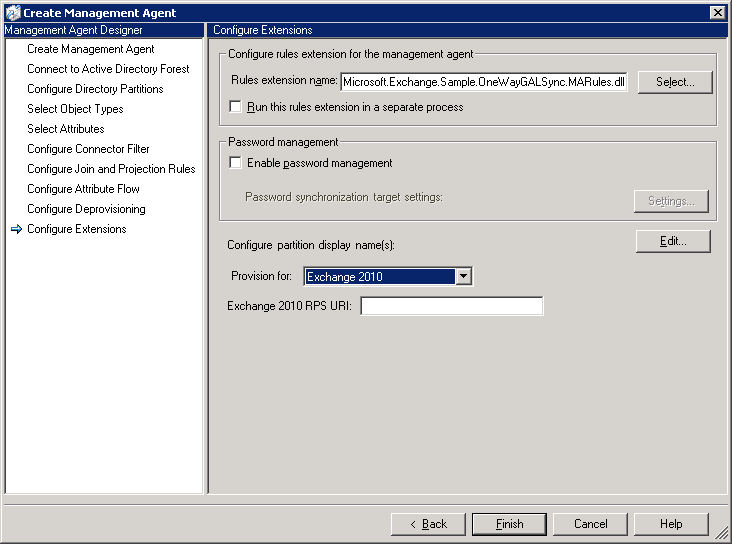
- On the Configure Extensions page, under Configure
partition display name(s): section, next to Provision
for:, select Exchange 2010. If you select Exchange 2010,
you will see the Exchange 2010 RPS URI field. Enter the URI
of an Exchange 2010 Client Access server to make sure the Remote
Powershell connection is functioning. The Exchange 2010 RPS
URI should be in the following format:
http://CAS_Server_FQDN/Powershell. Click OK.
 Note:
Note:Make sure that the administrator credentials used to connect to the Exchange 2010 forest can also make remote PowerShell connections to that forest.
The following figure shows how to select provisioning for Exchange 2010.
Testing Remote PowerShell Connection
This example tests whether you can make a remote PowerShell call to an Exchange 2010 Client Access server to verify that remote PowerShell is functioning correctly. From your ILM 2007 computer, first run this command:
 Copy Code Copy Code |
|
|---|---|
$rs = new-pssession -conf microsoft.exchange -conn http://CAS_SERVER_NAME/powershell -auth kerberos -cred (get-credential) |
|
Then run this command:
 Copy Code Copy Code |
|
|---|---|
Invoke-Command $rs {get-recipient -ResultSize 1}
|
|

