Applies to: Exchange Server 2007 SP3, Exchange Server
2007 SP2, Exchange Server 2007 SP1, Exchange Server 2007
Topic Last Modified: 2007-09-12
This topic explains how to create a custom theme for Microsoft Office Outlook Web Access. A theme is a collection of files and style sheets that control the appearance of Outlook Web Access. By default, two themes are installed when you install the Client Access server role on a computer that is running Microsoft Exchange Server 2007. The two themes are Seattle Sky and Carbon Black.
Only Outlook Web Access Premium supports custom themes. You cannot create custom themes for Outlook Web Access Light.
 New in Exchange 2007 SP1
Outlook Web Access added two additional themes in Exchange Server 2007 Service Pack 1 (SP1). The two new themes are Xbox and Zune.
 What Is Included in a Theme
A theme is a collection of media files and cascading style sheets (.css files). The files are stored on the Client Access server in the installation directory in \Client Access\OWA\version\themes. Each theme is stored in a subdirectory of themes.
The .css files define colors, gradients, and fonts. The image files (.gif files) provide the icons and other graphic elements. If you edit any of the icons, do not change their size. If you change the size of other graphic elements, test your changes to verify that the elements still fit together correctly.
The default theme (Seattle Sky) is the base theme and is found in \themes\base. The base folder contains all the files that are needed to define a theme. These include colors, fonts, icons, and graphics.
You can create additional themes by copying selected files into a new directory and modifying the files to fit the needs of your organization. In the Outlook Web Access user interface, themes are referred as color schemes. When a user selects a custom theme, the elements in the directory of the custom theme are used first, and any necessary elements that have not been customized are drawn from the base theme. For example, if you create a new theme by copying only the header graphics to a new theme and modifying them, when a user selects that theme, the header graphics will come from the new theme, and the rest of the theme properties will come from the base theme.
Themes are saved on each Client Access server. If you have more than one Client Access server, and you want a custom theme to be available on all servers, you must copy the theme to the themes directory on each Client Access server.
 Recommendations
Many elements of an Outlook Web Access theme can be changed. To avoid creating instability in Outlook Web Access, we recommend that you start by changing only the header, logon and logoff pages, and the colors that are used for selecting and highlighting.
If you want to make more complex changes, first study how .css files work. After you have developed a good understanding of cascading style sheets, change a few elements at a time and test your changes to make sure that the result is what you expect.
As a best practice, we recommend that you use the following guidelines:
- Always make backup copies of the original files before you
start editing them, especially when you are editing files in the
\themes\base directory.
- Do not delete the folder \Client
Access\OWA\version\themes\base or any of the files in
it.
- Do not change the information bars that appear at the top of
messages to warn users about potentially harmful content, phishing
attacks, viruses, and blocked or missing content.
The following figure illustrates an Outlook Web Access calendar request with two information bars.

 Before You Begin
To perform the following procedures, you must log on to the server that is hosting Outlook Web Access and the account that you use must be delegated membership in the local Administrators group.
 Creating a Theme
The following procedure gives you the general steps for creating a custom theme for Outlook Web Access. Specifics procedures for changing individual elements in an Outlook Web Access theme are included in the following sections.
To create a new Outlook Web Access theme-
On the Client Access server that is hosting Outlook Web Access, open Windows Explorer, and then find the Exchange server installation directory.
-
In \Client Access\OWA\<version>\themes, create a new folder.
-
Copy the premium.css and owafonts.css files from the base theme to the new folder.
-
Copy the files that you want change to create your theme from the base theme to the new folder that you created.
-
Modify the files in the new theme folder to create your theme.
-
Restart Internet Information Services (IIS) by using the iisreset/noforce command.
-
Test the new theme by logging on to Outlook Web Access and selecting the new theme.
Naming a Custom Theme
You can name a custom theme in two ways. The first way is to give the folder in which you created the new theme the name that you want the theme to have. For example, to name a custom theme "Fourth Coffee", name the folder in which you created the new theme Fourth Coffee.
You can also name a custom theme by copying the themeinfo.xml file from the base theme to the folder in which you created the custom theme, and then editing the file. You can edit the themeinfo.xml file by using a text editor such as Notepad to change the theme display name to the theme name that you want the theme to have.
To name a custom theme by editing the themeinfo.xml file-
Copy the themeinfo.xml file from the base theme folder to the folder in which you created the custom theme.
-
Open the copy of themeinfo.xml that is in the custom theme folder.
-
Find the theme displayname value, and change the value to the name that you want the theme to have.
Example: To name your theme Fourth Coffee, the file should read
theme displayname = "Fourth Coffee". -
Save your changes, and then close themeinfo.xml.
 Note: Note: |
|---|
| If you change the name of a theme, you must stop and start IIS for the change to take effect. You can do this by opening a Command Prompt window and using the command iisreset/noforce. |
Creating a Custom Header
You can customize the header of the main Outlook Web Access page. To change the header in Outlook Web Access, you will need the following files:
- premium.css
- owafonts.css
- logopt.gif
- logopb.gif
- nbbkg.gif
Premium.css and owafonts.css define the fonts and colors that are used by Outlook Web Access. Logopt.gif, logopb.gif, and nbbkg.gif are the image files that are used to create the header at the top of the page in Outlook Web Access.
Open the .gif files in an image editing tool to see how they are used to create the header in Outlook Web Access.
The following figure illustrates the original files that are used to create the header for the Seattle Sky Outlook Web Access theme.
 To create a custom header
-
Copy premium.css, owafonts.css, logopt.gif, logopb.gif, and nbbkg.gif from the base theme folder to the custom theme folder.
-
In the custom theme folder, open premium.css by using a text editor such as Notepad.
-
To remove "Connected to Microsoft Exchange" from the header, find
"background:url("logopb.gif")
no-repeat;"
and adddisplay:none;immediately after it. -
To change the logo, use an image editing tool to open and modify logopt.gif.
-
If you change the background color in logopt.gif, use your image editing tool to edit logopb.gif and nbbkg.gif to have the same background color.
-
After you edit the files, save your changes.
-
To test the changes to your custom theme, log on to Outlook Web Access, click Options, click General Settings, and then select your custom theme from the Appearance menu. You must save your changes and then click Refresh Internet Explorer to see the new theme.
Changing Colors in a Theme
To change the colors in a theme, you must find the values in the premium style sheet (premium.css) and then determine the HTML RGB values for the colors that you want to use. The HTML RGB color values are defined by a seven character string in the format of the number sign (#) followed by a string of six characters. To find the HTML RGB values for many colors, see the Color Table in the MSDN Library. If you must match a specific color and you cannot find a match for the color online, you can use an image editing tool to sample a color and determine its HTML RGB value.
To change the highlight color of the selected module in the navigation bar-
Open the premium.css file by using a text editor such as Notepad.
-
In the file, find the following:
 Copy Code
a.nbHiLt { background-color:#FFEFB2; } -
Replace the RGB value with the RGB value of the color that you want.
-
To test the changes to your custom theme, log on to Outlook Web Access, click Options, click General Settings, and then select your custom theme from the Appearance menu. You must save your changes and then click Refresh to see the new theme. If you already have an active Outlook Web Access session, press F5 to refresh the page so that you can see your changes.
The following figure illustrates a section of the Outlook Web Access Navigation bar with the Mail module highlighted.
 To change the primary and secondary list
selection colors
-
Open the premium.css file by using a text editor such as Notepad.
-
Find the following to change the primary selection color:
 Copy Code
tr.sel, tr.srsel, tr.lrsel { background-color: #FFEFB2; -
Find the following to change the secondary selection color:
 Copy Code
tr.shdw, tr.srshdw, tr.lrshdw { background-color:#F8F0D2; -
Replace the RGB values for the primary and secondary selection colors with the RGB values of the colors that you want.
-
To test your custom theme, log on to Outlook Web Access, click Options, click General Settings, and then select your custom theme from the Appearance menu. You must save your changes and then click Refresh to see the new theme. If you already have an active Outlook Web Access session, press F5 to refresh the page to see your changes.
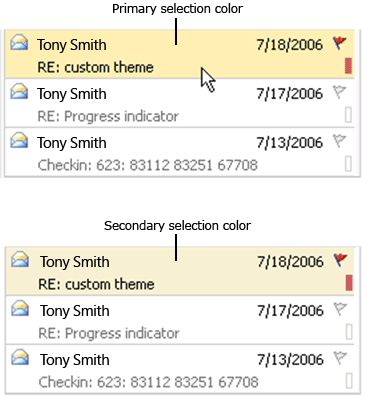
The primary selection color is used to highlight the selected item in the list pane when the focus is in that pane. If the user then moves the focus to the preview pane or navigation pane, the selected item in the list pane will be highlighted with the secondary selection color. The following figure illustrates the difference between primary and secondary selection colors in Outlook Web Access.
 Note: Note: |
|---|
| You can use the method that was used in the previous procedure to change the RGB values for other theme elements. |
Changing the Background of the List View
When you select Mail, Contacts, Tasks or Public Folders from the Navigation Pane, Outlook Web Access displays a list of items in the folders available in those modules.
You can add a background to the list view by modifying the settings in premium.css.
To change the background of the list view in Outlook Web Access-
Find or create an image in .gif format.
-
Copy the image file to the custom theme folder.
-
Open the premium.css file by using a text editor such as Notepad.
-
Find the following to change the background image:
 Copy Code
div#divLstV{width:100%;height:100%;} -
Edit the string to:
 Copy Code
div#divLstV{background-image: url(image file name);width:100%;height:100%;} -
Find the following to change the background transparency so the new image will display correctly:
 Copy Code
td#tdIL{background-color: #FFFFFF;height:100%;vertical-align:top;} -
Replace the background-color value with the value transparent:
 Copy Code
td#tdIL{background-color:transparent;height:100%;vertical-align:top;} -
To test your custom theme, log on to Outlook Web Access, click Options, click General Settings, and then select your custom theme from the Appearance menu. You must save your changes and then click Refresh to see the new theme. If you already have an active Outlook Web Access session, press F5 to refresh the page to see your changes.
 Changing the Default Outlook Web
Access Theme
You can change the default Outlook Web Access theme for a virtual directory from the base theme to a custom theme by using the Set-OwaVirtualDirectory cmdlet. You can also use the Set-OwaVirtualDirectory cmdlet to disable the theme selection option in Outlook Web Access. If you have multiple Outlook Web Access virtual directories, you can use the following procedures to set a default theme for each virtual directory.
When you set a default theme, only users who have not previously logged on to Outlook Web Access and selected a new theme will be forced to use the default theme.
To force all users to use the default theme, you must disable theme selection in addition to setting a new default theme.
To use the Exchange Management Shell to set the default theme for Outlook Web Access-
To set the default theme for Outlook Web Access where the server name is "FourthCoffee", the virtual directory name is "owa", the Web site name is "Default Web site", and the theme is in the folder named "Custom", run the following command:
 Copy Code
set-owavirtualdirectory -identity "fourthcoffee\owa (default web site)" -defaulttheme Custom
-
To disable theme selection in Outlook Web Access where the server name is "FourthCoffee", the virtual directory name is "owa", and the Web site name is "Default Web site", run the following command:
 Copy Code
set-owavirtualdirectory -identity "fourthcoffee\owa (default web site)" -themeselectionenabled $false
You can also complete both commands at the same time by running the following command:
 Copy Code Copy Code |
|
|---|---|
set-owavirtualdirectory -identity "fourthcoffee\owa (default web site)" -defaulttheme Custom -themeselectionenabled $false |
|
 Customizing the Logon and Logoff
Pages
The Outlook Web Access logon, language selection, and logoff pages are always created based on graphics and the logon.css file in the base theme folder. Therefore, to use custom logon and logoff pages, you must modify the files in the base theme folder. You can find the base theme folder in the Exchange installation directory at \Client Access\OWA\version\themes\base.
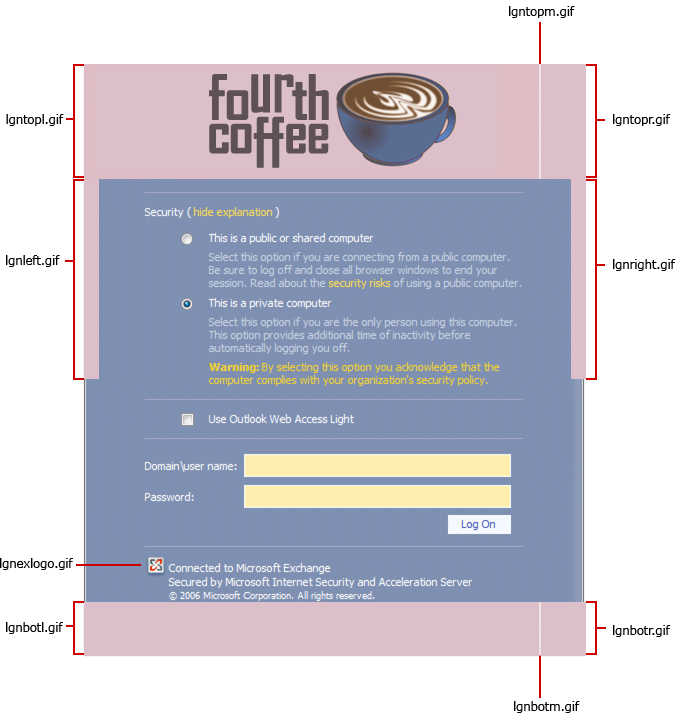
The logon, language selection, and logoff pages use the logon.css file to define text styles and colors. The pages are created by combining several images for the border top, bottom, and sides and also include repeating images and corners for expansion. The following files create the logon page:
- logon.css
- lgnbotl.gif
- lgnbotm.gif
- lgnbotr.gif
- lgnexlogo.gif
- lgnleft.gif
- lgnright.gif
- lgntopl.gif
- lgntopm.gif
- lgntopr.gif
It is easiest to create a new look by using a solid color because the same collection of images is used for three pages: the logon page, the language selection page that is shown on the first logon per mailbox, and the logoff page. The pages resize horizontally and vertically based on the contents of the page.
If you have multiple Client Access servers and want them all to use the same logon and logoff pages, you must copy the modified logon and logoff files to each Client Access server.
 Caution: Caution: |
|---|
| Because you must change the files in the base theme to create custom logon and logoff pages, back up copies of all the files that you will be changing before you start to create your custom logon and logoff pages. |
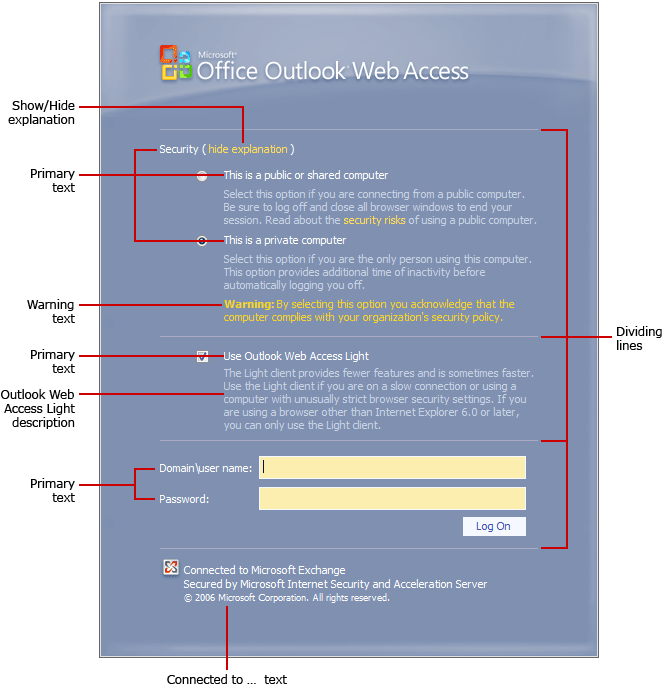
The following figures illustrate the default Outlook Web Access logon page as it appears if the user clicks show explanation and selects This is a private computer and Use Outlook Web Access Light. One figure shows how the graphics files that create the page fit together. The other figure shows how the logon.css file determines the colors of the background and text on the logon page.
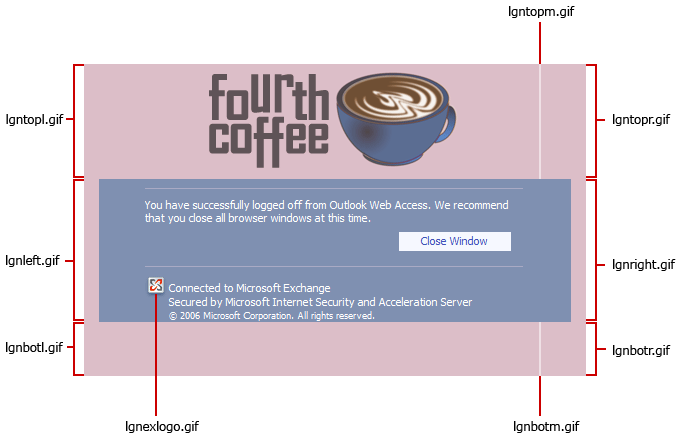
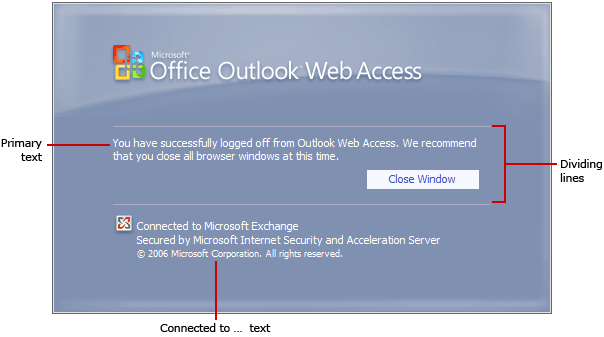
The following figures illustrate the default Outlook Web Access logoff page. One figure shows how the graphic files that create the page fit together. The other shows how the logon.css file determines the colors of the background and text on the logoff page.
Testing Changes to the Logon and Logoff Pages
After you have opened the Outlook Web Access logon or logoff page in Internet Explorer, you can test your changes without having to reset IIS or exit Internet Explorer.
To test changes to the logon and logoff pages-
Open the Outlook Web Access logon or logoff page in Internet Explorer.
-
On the toolbar, click Tools, and then click Internet Options.
-
On the General tab, under Browsing history, click Delete.
-
Under Temporary Internet Files, click Delete files, and then click Yes when you are asked whether you are sure that you want to delete all temporary Internet Explorer files
-
Click OK to close Internet Options.
-
Click Refresh to see your changes.
Repeat these steps to see your changes every time that you make a change to the logon or logoff page files. If you are making several changes, you can leave the logon or logoff page open and repeat the steps to see your changes.
Changing the Logo
To customize Outlook Web Access, you can change the Outlook Web Access logo on the logon and logoff pages to your organization's logo.
To change the logo in Outlook Web Access-
Create copies of the files that you want to change, and then save them to a safe location so that you can restore the original pages, if it is necessary.
-
Open the lgntopl.gif file by using an image editing tool, and then modify it to create the logo that you want to use.
-
Save your changes, and then click the Refresh button to see your changes.
 Note:
Note:If you have changed the background color of lgntopl.gif, we recommend that you modify the remaining files that are used to create the logon and logoff pages to match.
Changing the Font Styles and Colors
You can edit the logon.css file to change font styles and some of the colors that are used on the pages. This includes the background color that is behind the controls in the center of the logon page and the language selection page. If you have changed the color of these pages, we recommend that you change the background color to match.
To change the background and font colors of the logon, language selection, and logoff pages, you must find the values in the logon style sheet (logon.css) and then determine the HTML RGB values for the colors that you want to use. The HTML RGB color values are defined by a seven character string in the format of the number sign (#) followed by a string of six characters. To find the HTML RGB values for many colors, see the Color Table in the MSDN Library. If you must match a specific color and you cannot find a match for the color online, you can use an image editing tool to sample a color and determine its HTML RGB value.
To test your changes, open Internet Explorer and enter the URL for Outlook Web Access. If you are testing the changes to the Default Web site on the Client Access server that is hosting the Outlook Web Access virtual directory, you can test them by opening Internet Explorer and entering the URL https://localhost/owa.
 Note: Note: |
|---|
| The language selection page appears only the first time that a user logs on to Outlook Web Access. |
The following table lists the elements of the logon and logoff pages and a description for each element.
Logon and logoff page elements and their descriptions
| Element to change | String to search for | Description |
|---|---|---|
|
Background color |
|
The background color of the logon and logoff pages. If you change the background color of the graphics files, you should change the background color to match. |
|
Warning text |
|
The color of the warning text that appears when a user selects This is a private computer. On the existing Outlook Web Access logon page, this warning text light yellow and stands out well against the blue background. If you change the background color of the logon page, you may also want to change the color of the warning text so that it is readable. |
|
Primary text color |
|
The primary text color is white. It indicates options that can be selected and entry fields on the Outlook Web Access logon page. Examples include the labels for the user name and password fields, and the text next to the security options. If you have chosen a dark color for your logon pages, white will still work well for this text. |
|
Show explanation |
|
Link on the logon page that a user can click to show or hide the explanation of Private and Public logons. |
|
Outlook Web Access Light description |
|
When a user selects Use Outlook Web Access Light, a short explanation about Outlook Web Access Light is displayed. |
|
Connected to Microsoft Exchange |
|
The words Connected to Microsoft Exchange appear at the lower-left corner of the logon and logoff pages. Changing this value changes the color of the text in those words. |
|
Dividing lines |
|
All three pages that use logon.css have thin lines that divide them into sections. These pages include logon, logoff, and language selection. After you change the background and font colors, you may want to change the color of the lines so that the lines will still be visible, but not more visible than the text. |
After you have decided which elements you want to change the color of and identified the HTML RGB color values that you will be changing those elements to, use the following procedure to change the color of any element that is defined by a .css file.
To change the color of an element-
Open logon.css.
-
Use the table of logon and logoff page elements included earlier in this topic to find the string that matches the element that you want to change.
-
Replace the HTML RGB color value of the element that you want to change with the new HTML RGB color value that you want to use for that element.
-
Save your changes and close logon.css.
-
Test your changes by opening Internet Explorer and entering the URL for the Outlook Web Access logon page.
 Note: Note: |
|---|
| If you have already opened the Outlook Web Access logon URL, you can test your changes by deleting the temporary Internet files and refreshing Internet Explorer. To do this, click Tools, and then click Internet Options. On the General tab, under Browsing history, click Delete. Under Temporary Internet Files, click Delete files, and then click Yes when you are asked whether you are sure that you want to delete all temporary Internet Explorer files Click OK to close Internet Options, and then press F5 to refresh the logon page. |

