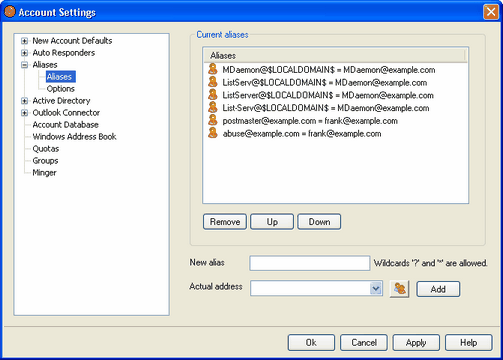
The Aliases options, located at Accounts » Account Settings, make it possible for you to create alternate mailbox names for your accounts or mailing lists, which are useful when you want multiple mailbox names to resolve to a single user account or list. Without aliases you'd have to create separate user accounts for each address and then forward messages or use complicated filter rules to associate them with other accounts.
For example, if frank@example.com handled all billing inquiries to your domain, but you wanted to tell everyone to send them to billing@example.com, then you could create an Alias so that messages addressed to billing@example.com would actually go to frank@example.com. Or, if you were hosting multiple domains and wanted all messages addressed to the Postmaster (regardless of the domain) to go to frank@example.com, then you could use a wildcard to associate the alias, Postmaster@*, with his address.
Current Aliases
This window contains all current aliases that you have created.
Remove
Click this button to remove a selected entry from the Current Aliases list.
Up
Aliases are processed in the order in which they are listed. You can move an alias to a higher position in the list by selecting it and then clicking this button.
Down
Aliases are processed in the order in which they are listed. You can move an alias to a lower position in the list by selecting it and then clicking this button.
New alias
Enter the email address that you wish to be an alias of the "Actual address" listed below. Wildcards of "?" and "*" are acceptable, and you can use "@$LOCALDOMAIN$" in the alias as a wildcard that will match only your local domains. For example: "frank@example.*", "*@$LOCALDOMAIN$", and "frank@$LOCALDOMAIN$" are all valid for use in an alias.
Actual address
Select an account from the drop-down list, use the Account icon to browse for an account, or type a new address or mailing list into this space. This is the actual address that will receive the message when it is addressed to a corresponding alias.
Add
Click the Add button to add the alias to the list. The the New alias and Actual address values will be combined and placed in the Current Aliases window.
See: