Applies to: Exchange Server 2007 SP3, Exchange Server
2007 SP2, Exchange Server 2007 SP1, Exchange Server 2007
Topic Last Modified: 2008-10-23
This topic explains how to use Exchange Server 2007 Setup or unattended installation to install the first Microsoft Exchange Server 2007 server in an existing Exchange organization.
You can't perform an in-place upgrade from Exchange Server 2003 or Exchange 2000 Server to Exchange 2007. However, you can install an Exchange 2007 server into the existing Exchange organization and then move the Exchange resources, such as mailboxes, public folders, and connectors to Exchange 2007. After you perform this procedure, you will be running in a coexistence mode. You can maintain this mode for an indefinite period of time, or you can immediately complete the transition to Exchange 2007 by moving all resources from Exchange 2003 to Exchange 2007 and then decommissioning the Exchange 2003 servers.
 Note: Note: |
|---|
| There are no procedural differences between Exchange 2007 coexistence with Exchange 2003 and Exchange 2007 coexistence with Exchange 2000. Any procedures or documentation that refer to Exchange 2003 only also apply to Exchange 2000. |
When you install Exchange 2007 in an existing Exchange 2003 organization, Setup performs the following coexistence-specific tasks:
- It creates the Active Directory universal security group
ExchangeLegacyInterop. This group is granted the permissions that
allow the Exchange 2003 and Exchange 2000 servers to send
e-mail to the Exchange 2007 servers.
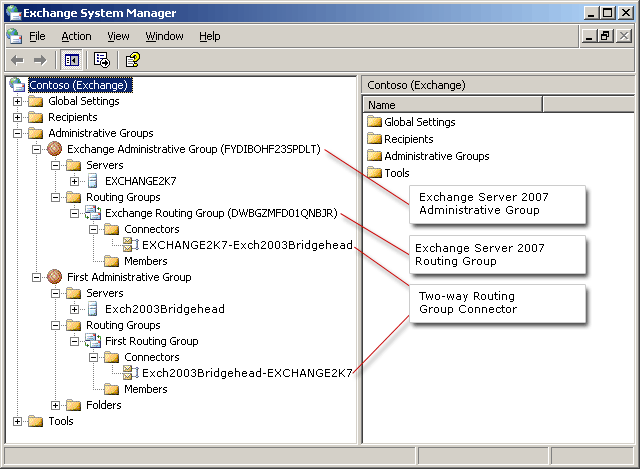
- It creates the Exchange 2007 Administrative Group. This
administrative group is called Exchange Administrative Group
(FYDIBOHF23SPDLT).
 Caution:
Do not move Exchange 2007 servers out of Exchange Administrative Group (FYDIBOHF23SPDLT) and do not rename Exchange Administrative Group (FYDIBOHF23SPDLT) by using a low-level directory editor. Exchange 2007 must use this administrative group for configuration data storage. We do not support moving Exchange 2007 servers out of Exchange Administrative Group (FYDIBOHF23SPDLT) or renaming of Exchange Administrative Group (FYDIBOHF23SPDLT). - It creates the Exchange 2007 Routing Group. This routing
group is called Exchange Routing Group (DWBGZMFD01QNBJR).
 Caution:
Do not move Exchange 2007 servers out of Exchange Routing Group (DWBGZMFD01QNBJR) and do not rename Exchange Routing Group (DWBGZMFD01QNBJR) by using a low-level directory editor. Exchange 2007 must use this routing group for communication with earlier versions of Exchange. We do not support moving Exchange 2007 servers out of Exchange Routing Group (DWBGZMFD01QNBJR) or renaming of Exchange Routing Group (DWBGZMFD01QNBJR) - It creates a two-way routing group connector between
Exchange 2007 and a selected Exchange 2003 bridgehead
server. Exchange 2007 and Exchange 2003 use different
routing topologies. You must configure a routing group connector to
enable mail flow between the Exchange versions.
 Note: Note: |
|---|
| You can install Exchange 2007 in a native mode Exchange organization. However, if you create a new forest in which to install Exchange 2007, you cannot later add earlier versions of Exchange. This scenario is not supported. |
You complete Exchange 2007 installation by performing several tasks. You can complete all these tasks at the same time, or you can perform some of the tasks before you start Exchange 2007 server role installation. To complete installation, follow these steps:
- Install prerequisite tools You can
install the prerequisite tools on the computer where you will
install Exchange 2007 before you install the server roles. The
prerequisite tools are Microsoft .NET Framework 2.0, Microsoft
Management Console 3.0, and Microsoft Windows PowerShell. Links to
these tools are provided in Exchange Server 2007
Setup.
- Prepare the Active Directory directory
service You can extend the Active Directory
schema and create the Active Directory objects and universal
security groups to support Exchange 2007 before you install
the server roles. Run setup.com /PrepareAD from
the command line on the domain controller that is the schema master
at the forest root. When you run setup.com /PrepareAD,
the task setup.com /PrepareLegacyExchangePermissions
also runs to create the universal security group that is granted
permissions to send e-mail to Exchange 2007 Hub Transport
servers. If you do not perform this task before you
start installation, it will run during installation. For more
information, see How to Prepare Active
Directory and Domains.
- Install server roles You can install
Exchange 2007 by using Exchange Server 2007 Setup,
or perform an unattended installation by running
setup.com from the command line. You can select to
perform a typical installation to install the Mailbox, Hub
Transport, and Client Access server roles, or you can select to
perform a custom installation to install one or more server roles.
If the Exchange 2003 organization has front end servers, the Client
Access server role is typically the first role deployed. You must
install the Hub Transport server role and the Mailbox server role
to have a fully functional Exchange 2007 organization.
 Before You Begin
Before you begin, follow these steps:
- Create a transition plan. If you plan to maintain a coexistence
environment for any period of time, see Planning for
Coexistence.
To complete your transition plan, see the following topics:
- Verify that the server on which you will install Exchange 2007
meets the system requirements for the server roles that you are
installing. For more information, see Exchange 2007 System
Requirements.
- Verify that your existing Exchange organization is running in
native mode. An Exchange organization is running in native mode
should not contain any servers that are running a version of
Exchange previous to Exchange 2000 Server. For more
information, see Coexisting with Exchange
Server 2003 and Exchange 2000 Server.
- Verify that no Exchange 2003 transaction log files or
database files are located in the root directory of a drive, such
as the D:\Priv1.edb directory. If Exchange 2003 transaction
log files or database files are located in the root directory of a
drive, use the Exchange System Manager tool to move the files to a
subfolder.
 Note: Note: |
|---|
| We recommend that you do not store Exchange transaction log files or database files in the root directory of a drive. For more information see Warning Message When Exchange Management Console in Exchange 2007 is Opened. |
To perform the following procedure, the account you use must be delegated membership in the Schema Administrators group if you have not previously prepared the Active Directory schema.
If you are installing the first Exchange 2007 server in the organization, the account you use must have membership in the Enterprise Administrators group.
For more information about permissions, delegating roles, and the rights that are required to administer Exchange 2007, see Permission Considerations.
 Procedure
 To use Exchange
Server 2007 Setup to install Exchange 2007 in an existing Exchange
organization
-
Log on to the server on which you want to install Exchange 2007.
-
Insert the Exchange Server 2007 DVD into the DVD drive. If Setup.exe does not start automatically, open the DVD directory, and then double-click Setup.exe.
-
On the Start page, complete Steps 1 through 3 to install the prerequisite tools.
 Note:
Note:If you already have Microsoft .NET Framework 2.0, Microsoft Management Console (MMC) 3.0, and Windows PowerShell installed, these steps will be unavailable. If you have not installed Microsoft .NET Framework 2.0, Setup will link to .NET Framework Developer Center. If you have not installed Microsoft Management Console (MMC) 3.0, Setup will link to MMC 3.0 update is available for Windows Server 2003 and for Windows XP. If you have not installed Microsoft Windows PowerShell, Setup will link to Windows PowerShell 1.0 English Language Installation Packages for Windows Server 2003 Service Pack 1 and for Windows XP Service Pack 2. -
On the Start page, click Step 4: Install Microsoft Exchange. Setup copies the setup files to the computer on which you are installing Exchange 2007.
-
In Exchange Server 2007 Setup, on the Introduction page, click Next.
-
On the License Agreement page, select I Accept the terms in the license agreement, and then click Next.
-
On the Error Reporting page, select the appropriate selection and then click Next.
-
On the Installation Type page, click Typical Exchange Server Installation or Custom Exchange Server Installation. If you want to change the path for the Exchange Server 2007 installation, click Browse, locate the appropriate folder in the folder tree, and then click OK. Click Next.
 Note:
Note:If you select the Typical Exchange Server Installation option, you will be unable to install the Unified Messaging server role, Edge Transport server role, or clustered mailbox servers during this installation. You can install additional server roles later by using Setup.com or Add or Remove Programs from Control Panel. -
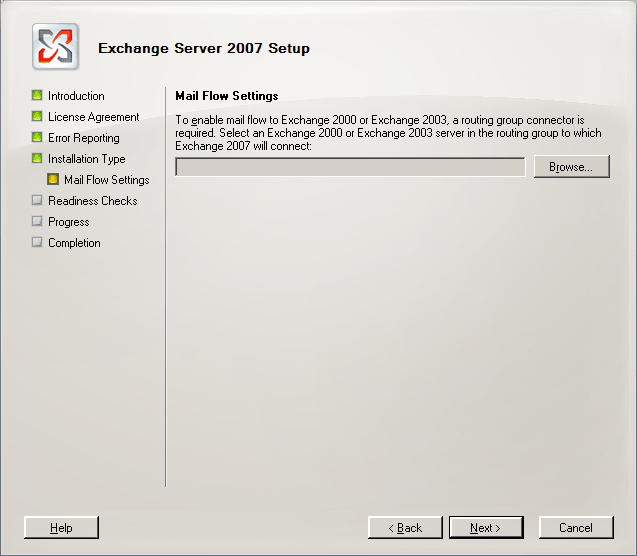
On the Mail Flow Settings page, click Browse to select an Exchange 2003 bridgehead server that is located in the routing group to which you will create the initial routing group connector.

Figure 1 Mail Flow Settings page -
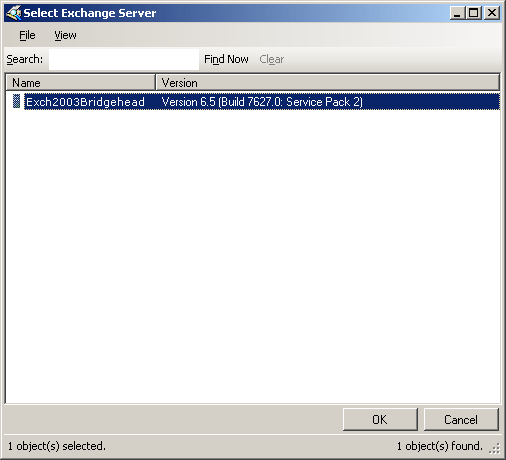
The Select Exchange Server dialog box appears. Select an Exchange 2003 bridgehead server, and then click OK.

Figure 2 Select Exchange Server dialog box -
On the Mail Flow Settings page, click Next.
-
On the Readiness Checks page, wait for all readiness checks to complete, and then click Install.
-
On the Progress page, wait for the organizational preparation, copying of Exchange files, and installation of server roles to complete, and then click Finish.
 To perform an
unattended installation of Exchange 2007 in an existing Exchange
organization
-
Open a command prompt and change directories to the Exchange 2007 source files. Run the following command:
 Copy Code
Setup /mode:Install /roles:ClientAccess,HubTransport,Mailbox /LegacyRoutingServer:Exch2003BH.Contoso.com
For detailed syntax and parameter information, see How to Install Exchange 2007 in Unattended Mode.
 After You Finish
After installation is complete, you can view the Exchange 2007 configuration objects in Exchange System Manager in Exchange 2003, as shown in Figure 3.

 Important: Important: |
|---|
| Although you can view the Exchange 2007 configuration objects in Exchange System Manager in Exchange 2003, you must use only Exchange 2007 tools to manage Exchange 2007 objects. |
To verify that mail flow is working correctly, follow these steps:
- Create a mailbox on the Exchange 2007 Mailbox server. For
more information, see How to Create a Mailbox
for a New User.
- Send an e-mail message from the Exchange 2007 mailbox to a
user who has a mailbox that is located on an
Exchange 2003 server. Verify that the e-mail message is
received.
- Send an e-mail message from a user who has a mailbox that is
located on an Exchange 2003 server to the new
Exchange 2007 mailbox user. Verify that the e-mail message is
received.
Perform the Finalize Deployment Tasks tasks that are required for the server roles that you have installed.
You can now continue to transition the Exchange organization, or you can maintain a coexistence environment. If you will be operating in a coexistence environment, make sure that you read Planning for Coexistence.
 For More Information
For more information, see the following topics:
- Planning for
Coexistence
- Coexisting
with Exchange Server 2003 and Exchange 2000 Server
- Message
Routing in a Coexistence Environment
- How to
Perform a Typical Installation Using Exchange Server 2007
Setup
- How to
Perform a Custom Installation Using Exchange Server 2007
Setup
- How to
Install Exchange 2007 in Unattended Mode
- Moving
Mailboxes
- New-RoutingGroupConnector

